Recurring payments
4Geeks allows you to create complete systems of recurring charges, typical of business models based on subscription with periodic payments, simply and quickly, without you having to worry about additional programming tasks.
This product was created with SaaS platforms in mind, such as Netflix, Uber or Slack, capable of handling and managing multiple clients subscribed to their plans, but which also meet minimum security requirements.
Through the Console you can manipulate the creation and complete management of the plans, as well as view the subscribers of each plan, and their status in the cycle billing. It is the responsibility of 4Geeks to charge the card according to the recurrence cycle configured for the plan.
There is no limit to the number of plans you want to create, or even the users subscribed to each plan.
Note
A Plan represents the type of service a customer can subscribe to, and encompasses a defined number of features. A Subscription is started when a new subscriber enrolls in a plan. When a user subscribes to a plan, you become a Subscriber.
Service activation
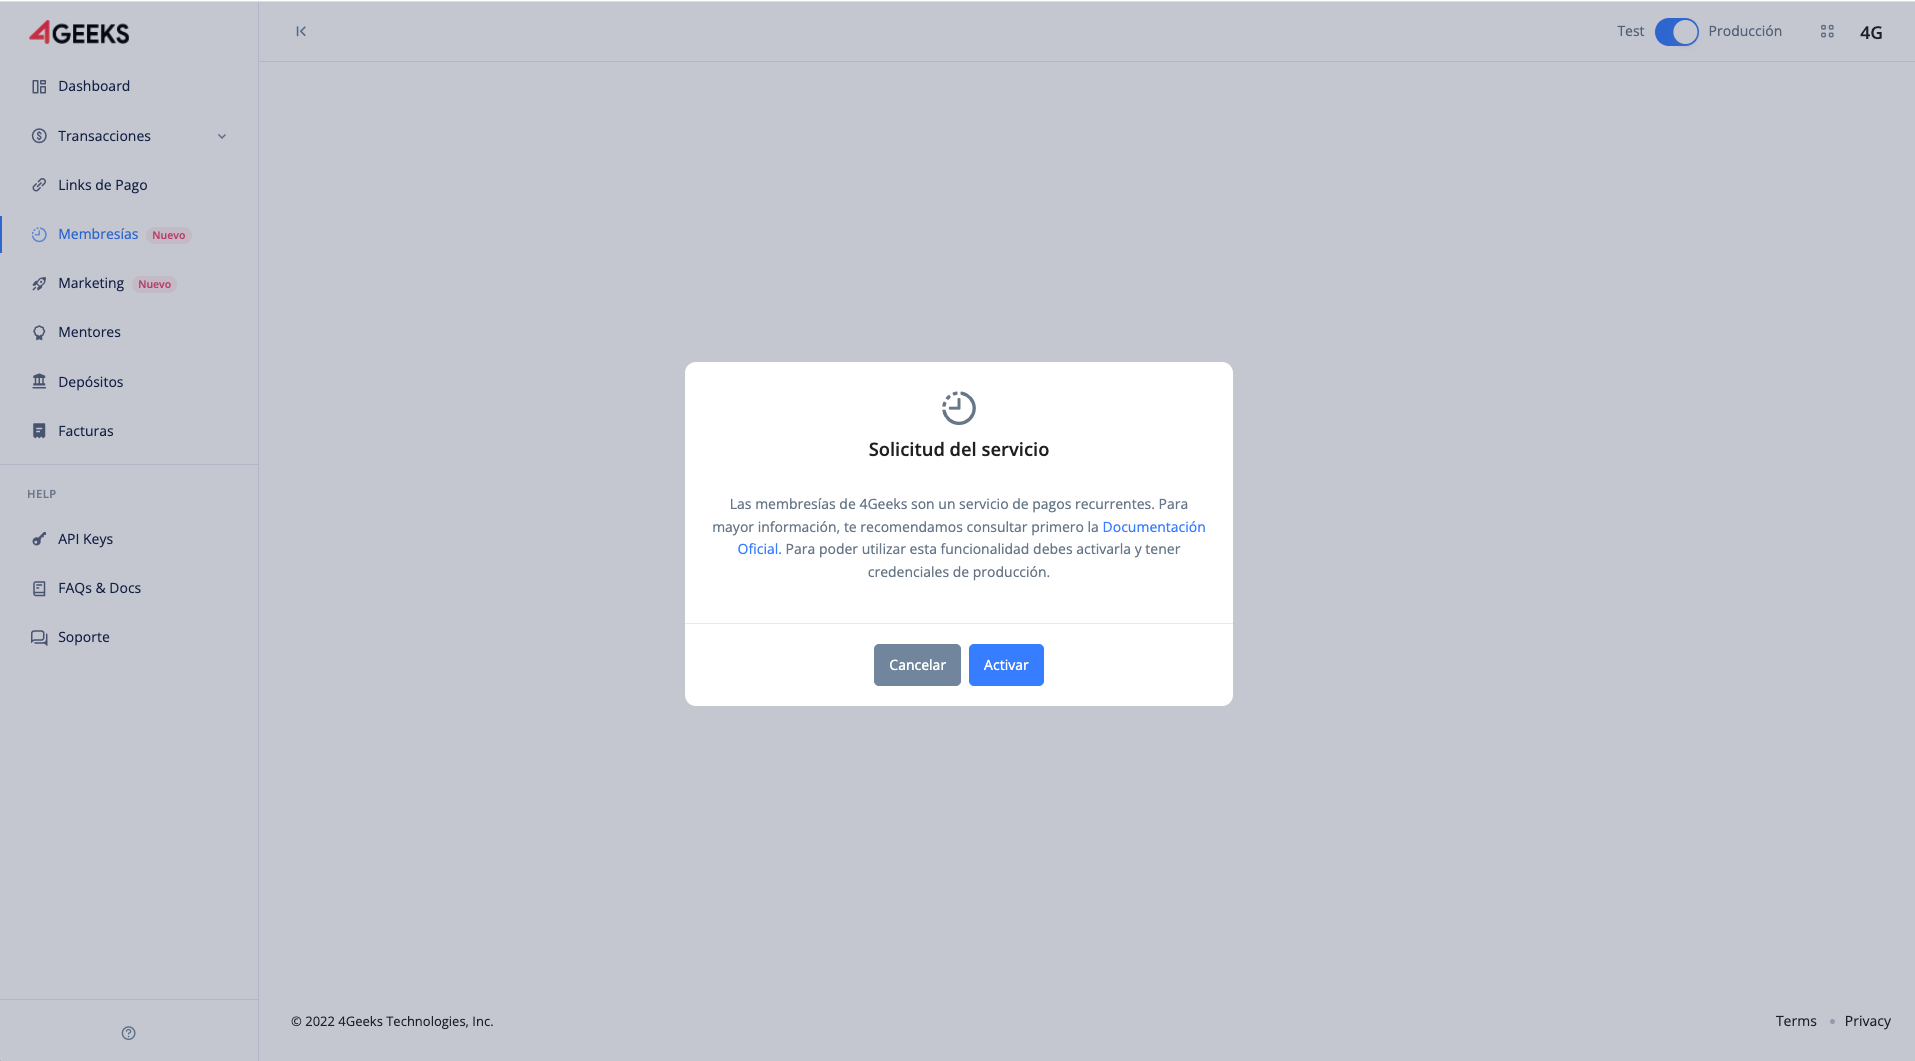
When you enter the plan service for the first time, you will see a notice notifying you of your interest in activating the plan functionality. If you accept it, your decision will be persistent, otherwise you will be asked each time you enter the service.
Webhook config
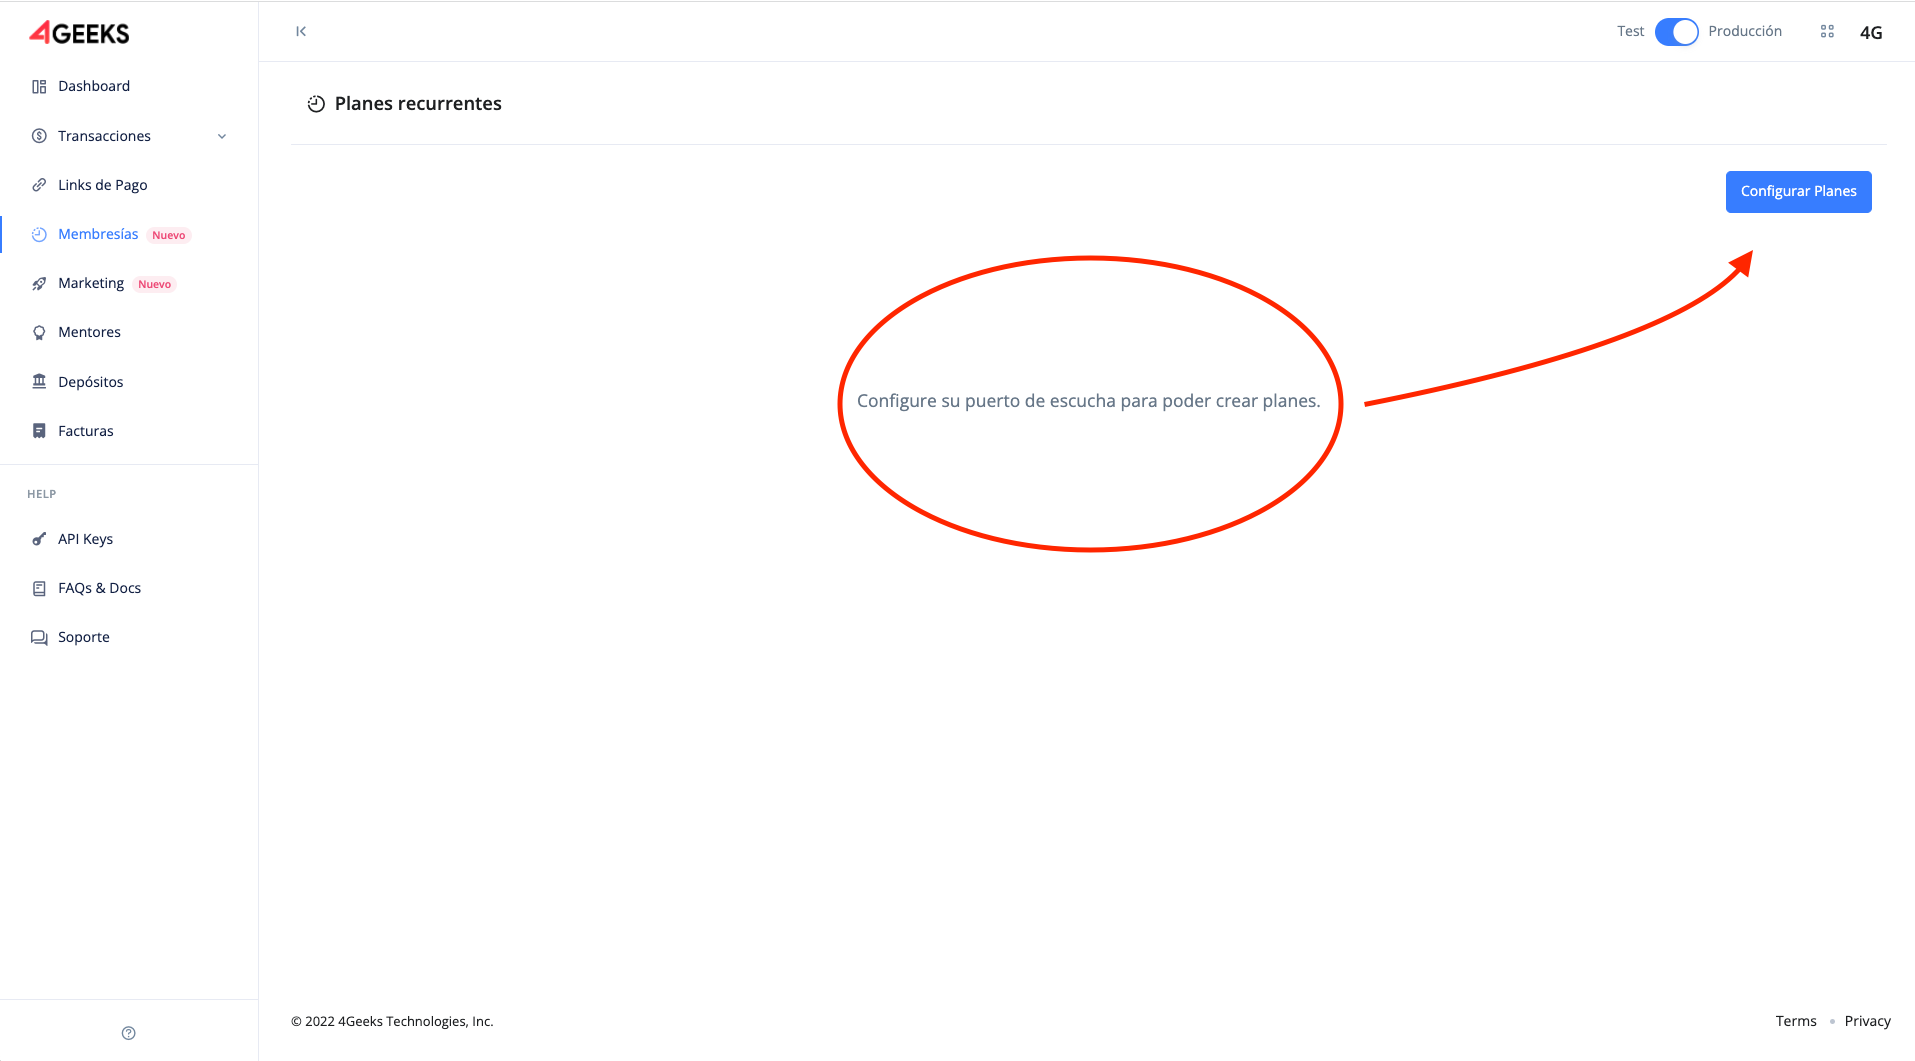
In order to use the service, it is necessary for the user to configure the URL of their server endpoint in order to receive webhook notifications(see section Webhook Notifications).
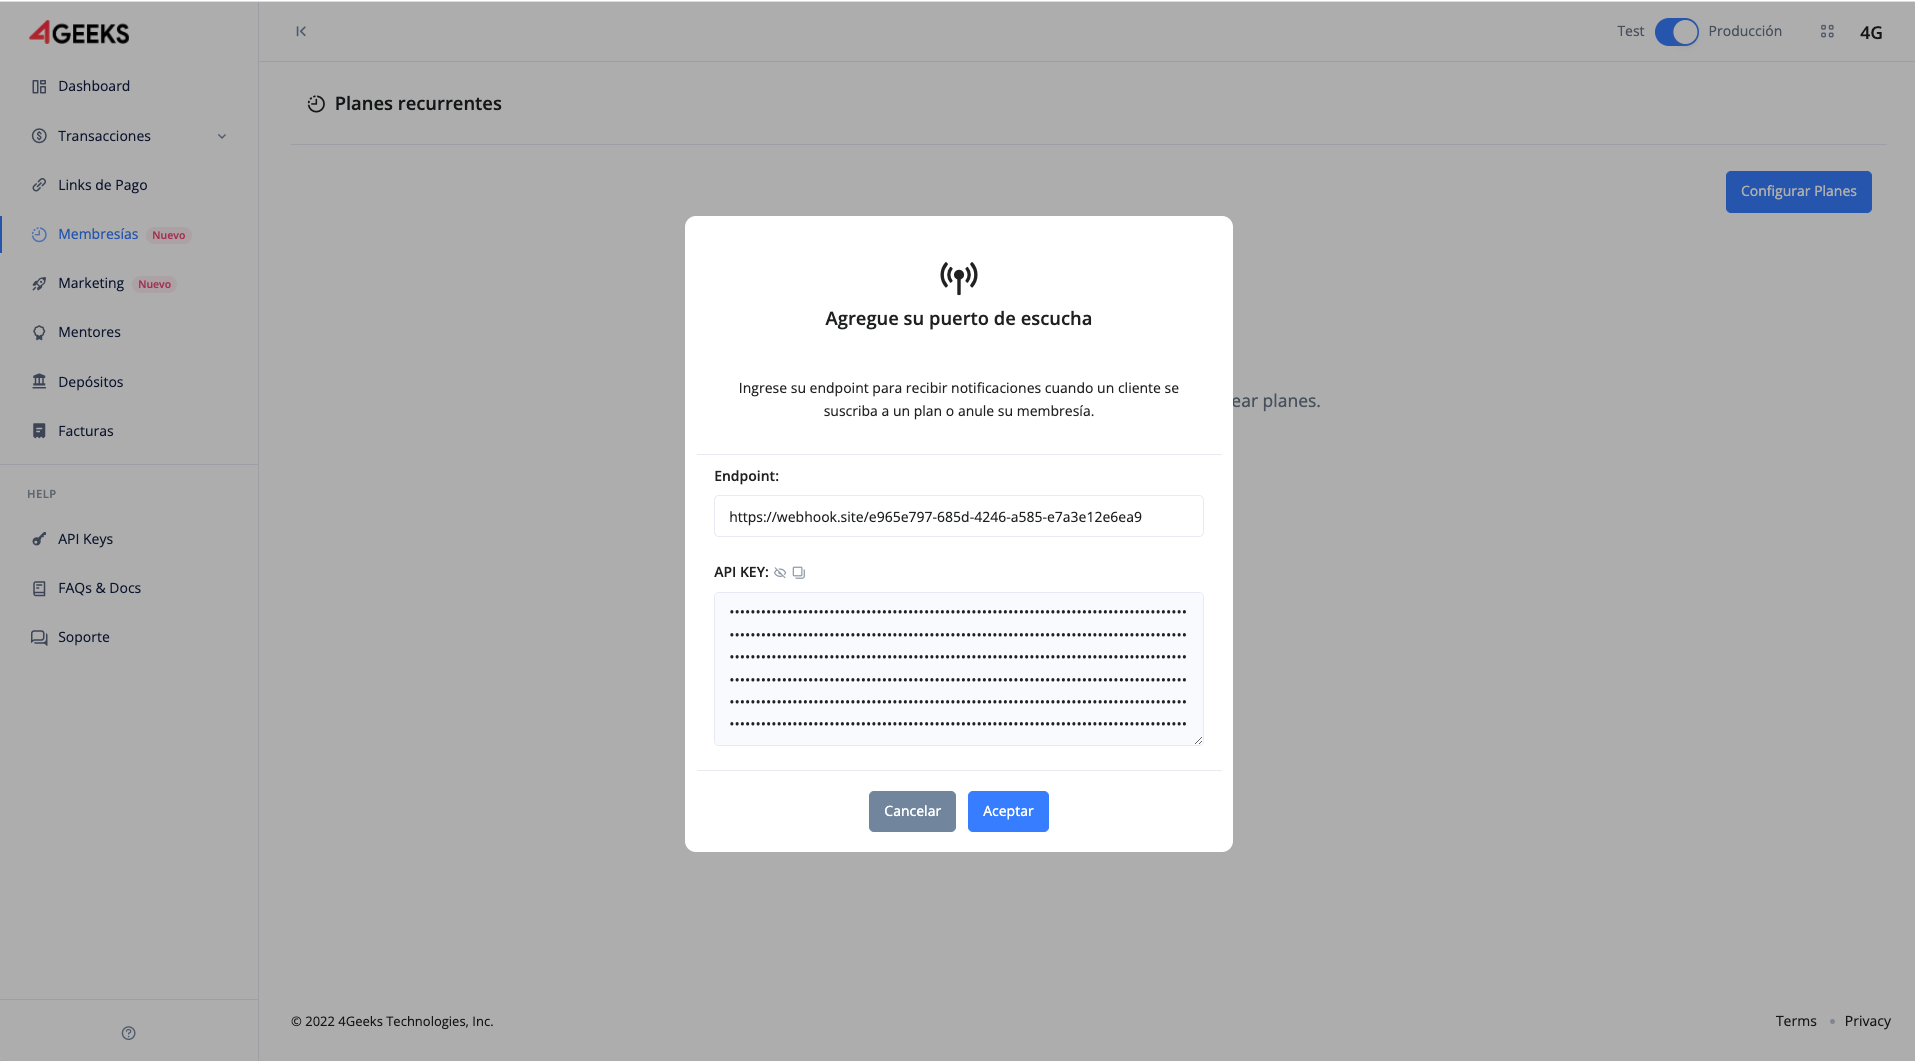
To do this, click on the Set Plans button, where a pop-up window will appear with the space to save the URL address.
:::note This endpoint is global for all plans, you cannot set an individual one for each plan created. :::
Also, in this window a code with the name API KEY is shown. This corresponds to the decryption key for the webhooks information (see section Webhook Notifications).
:::note This code is unique to the user and is generated only once. It should not be shared. :::
Creating a plan
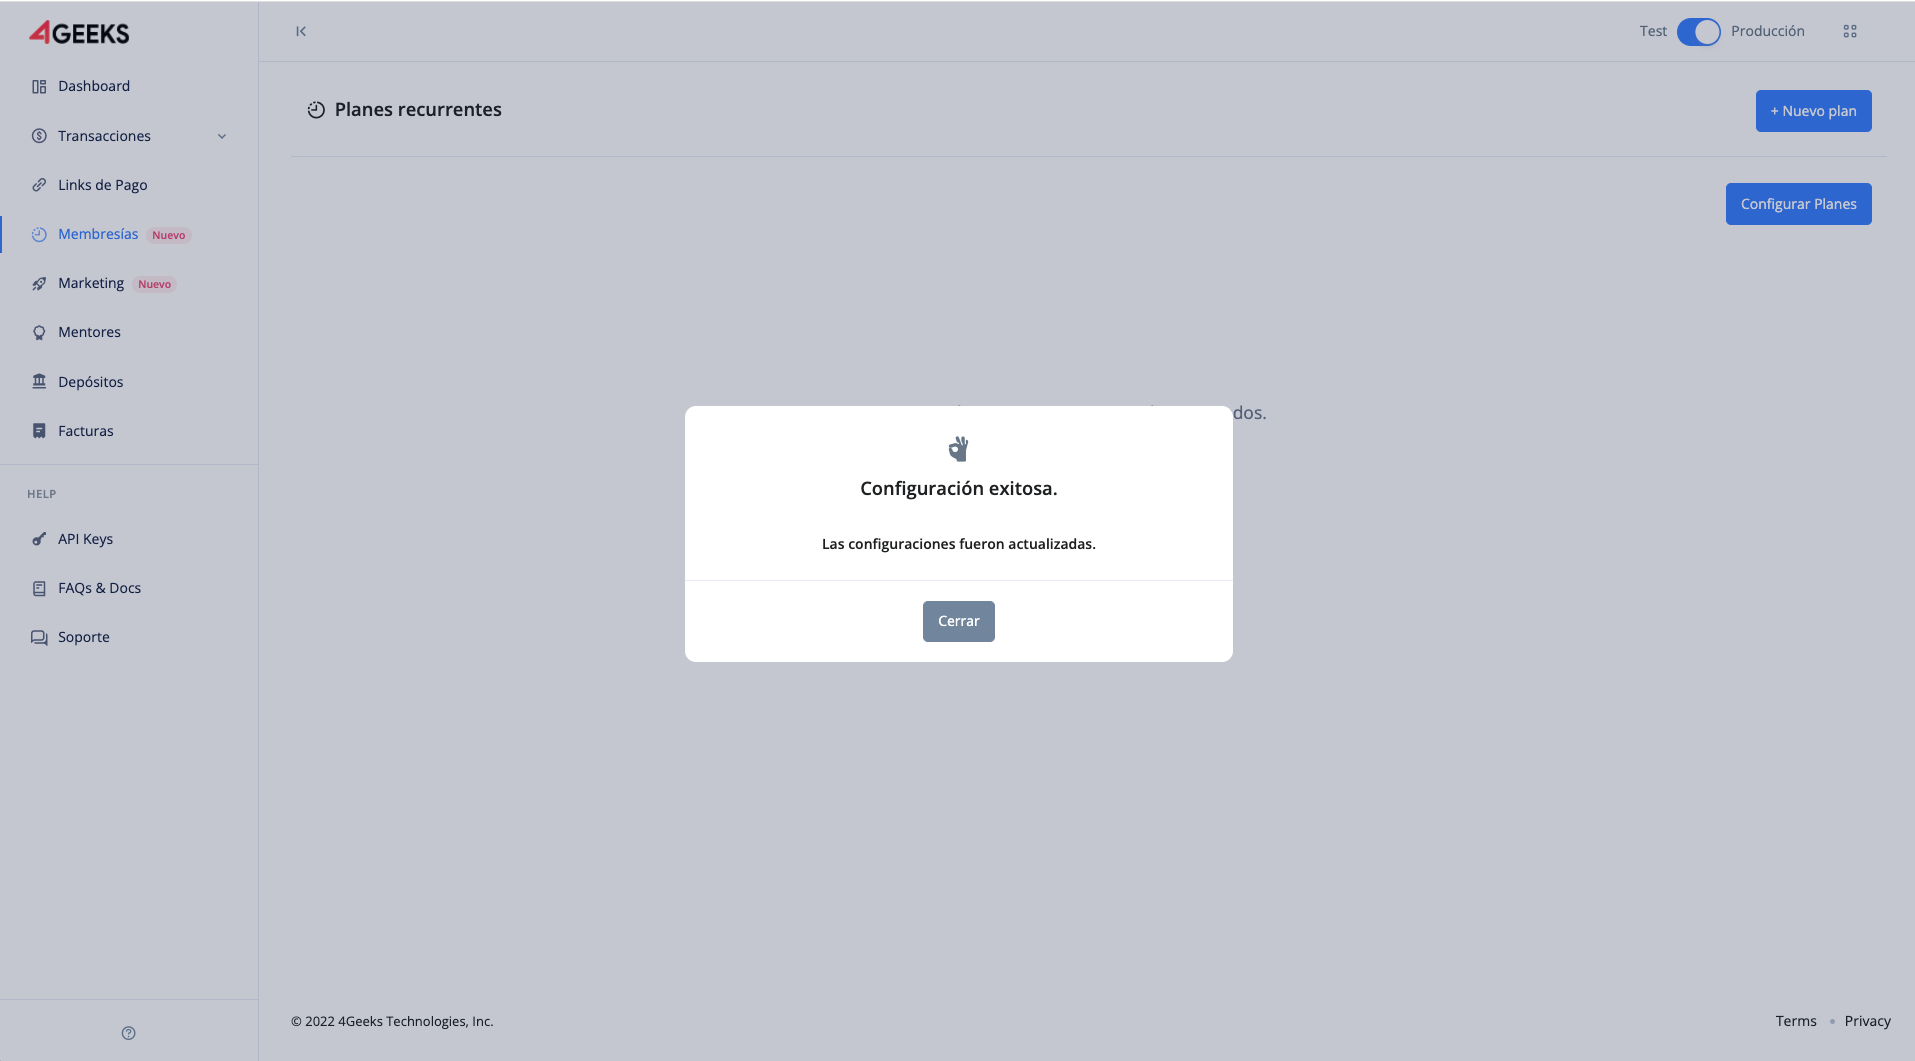
To create a plan, click on the button + New plan. Here you will see a form with a request for basic data. Each space has a guide in case of doubt and that represents each field.
:::note Each plan name must be unique. There cannot be two plans with the same name. :::
:::note The plan image must have square dimensions (nxn). If you do not choose an image, the user’s default image will be used. :::
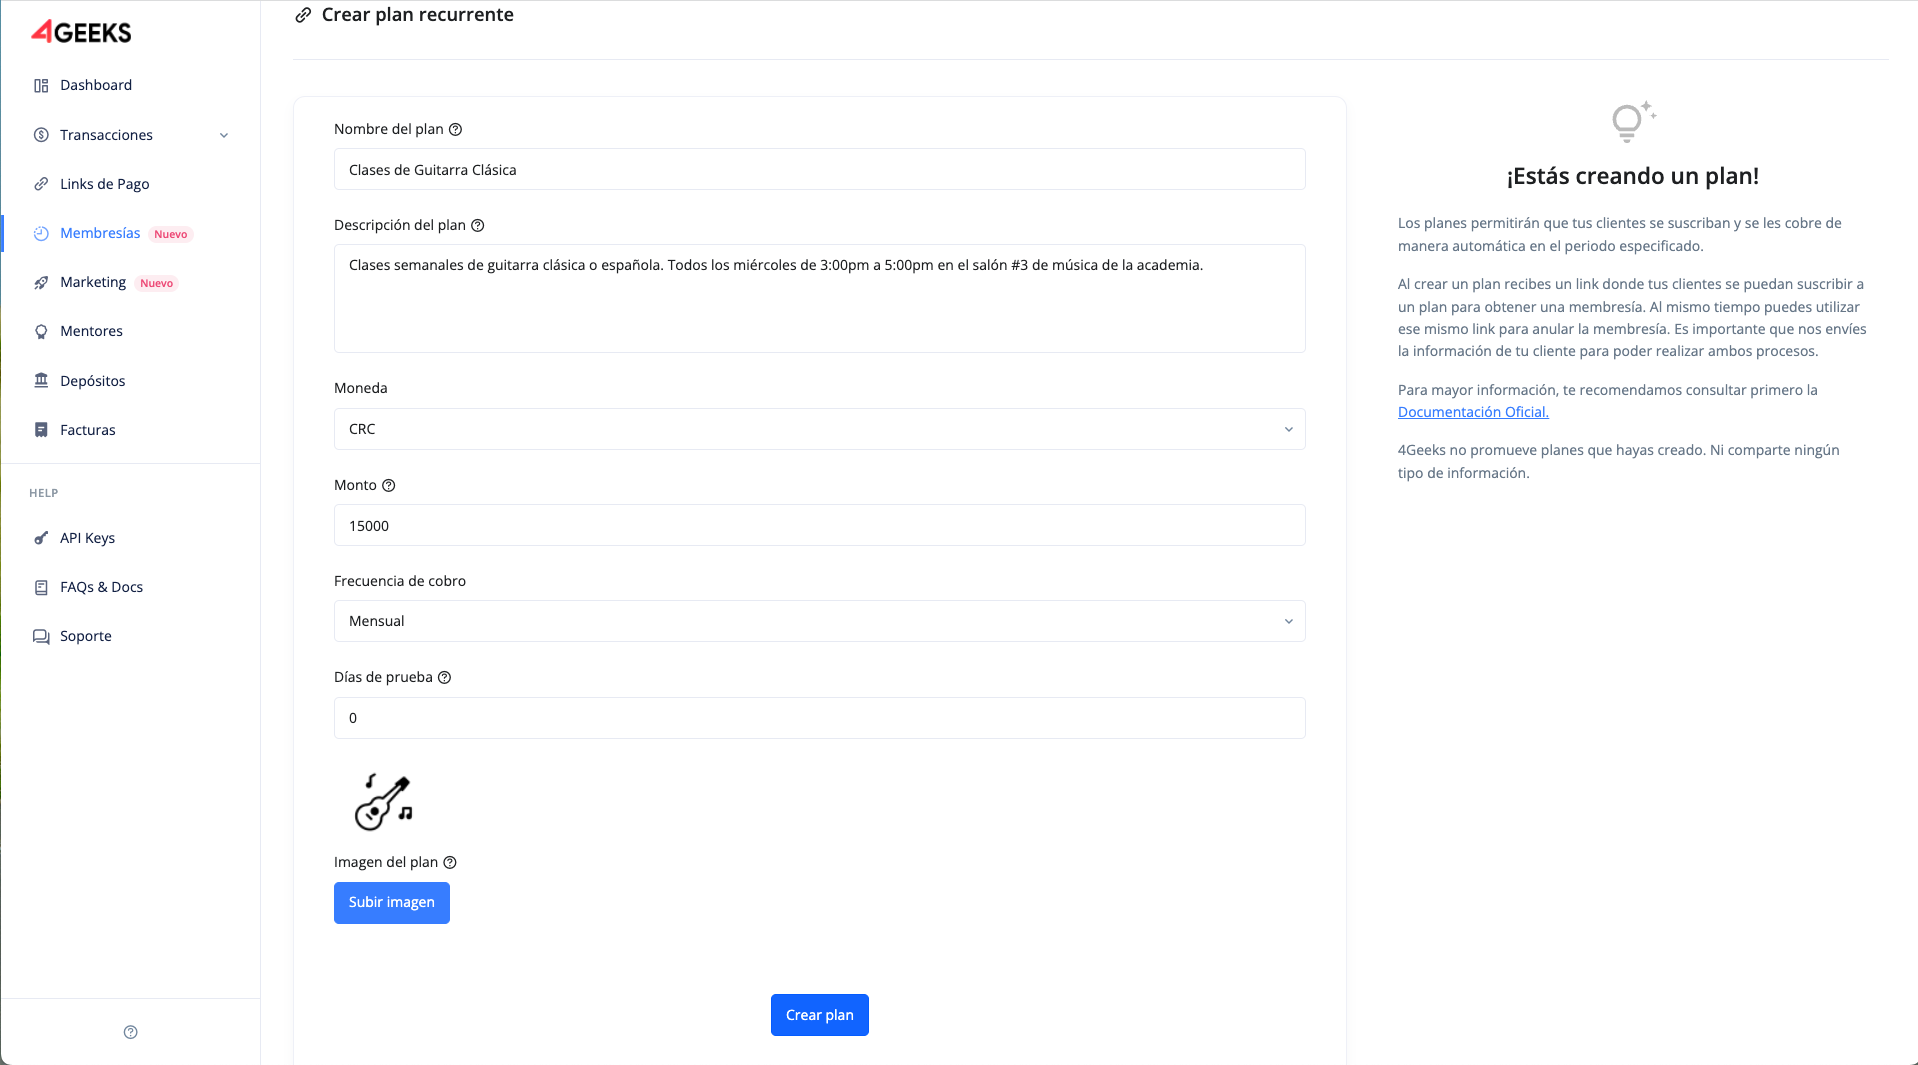
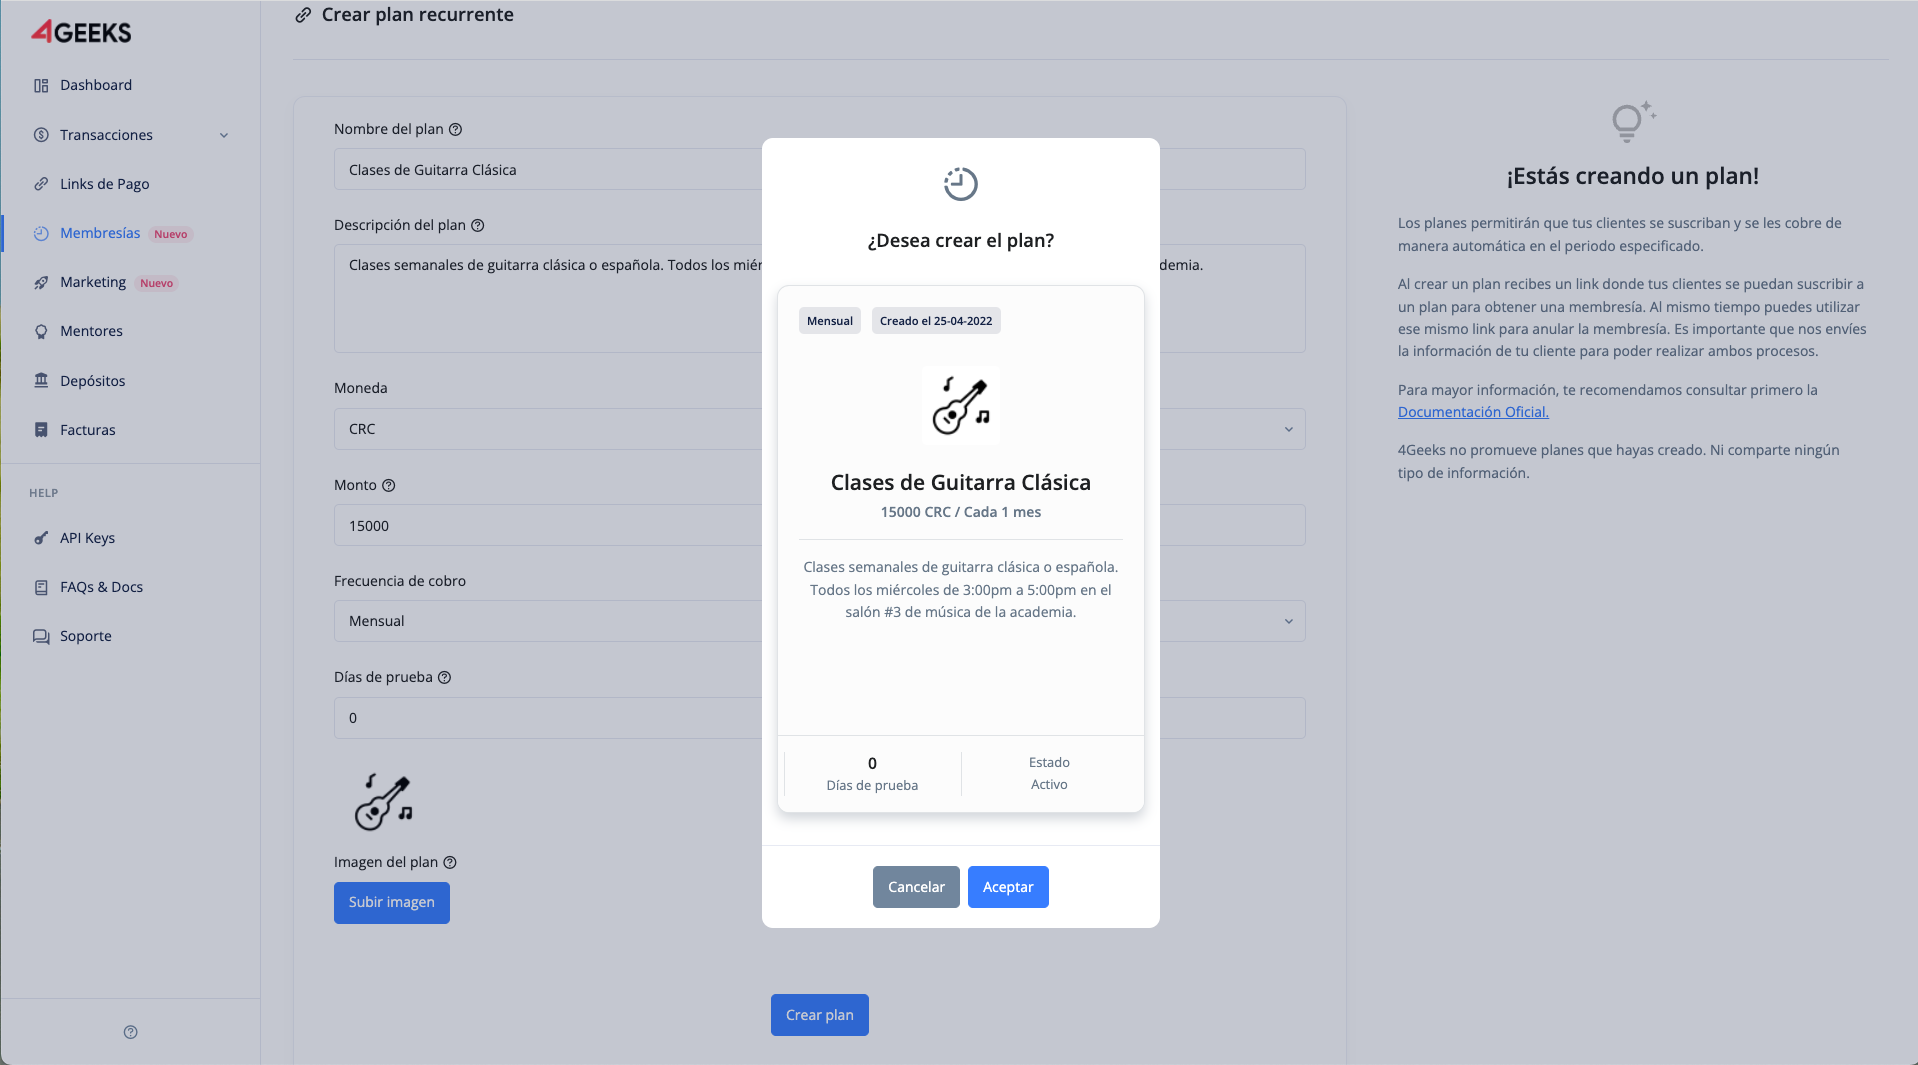
When you accept you will see a preview of the plan letter, when you accept again you will see a message confirming the action taken.
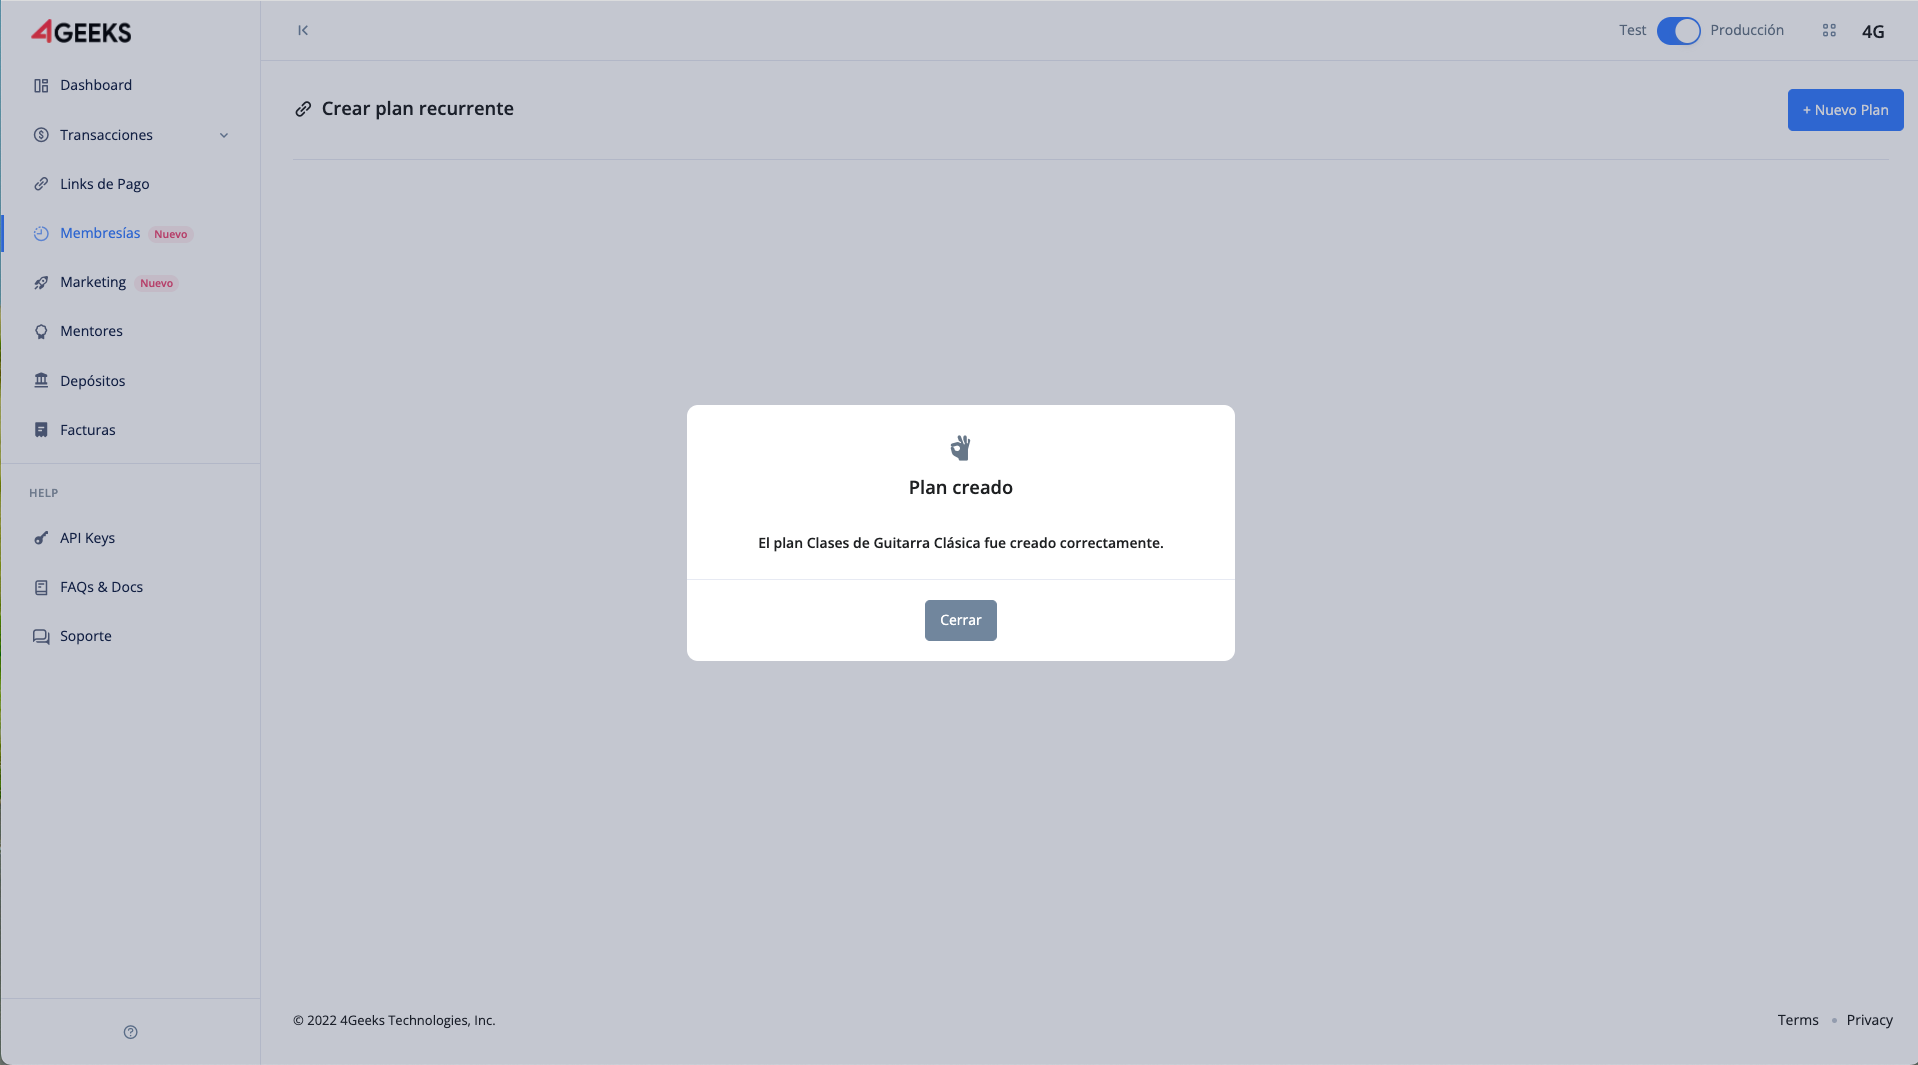
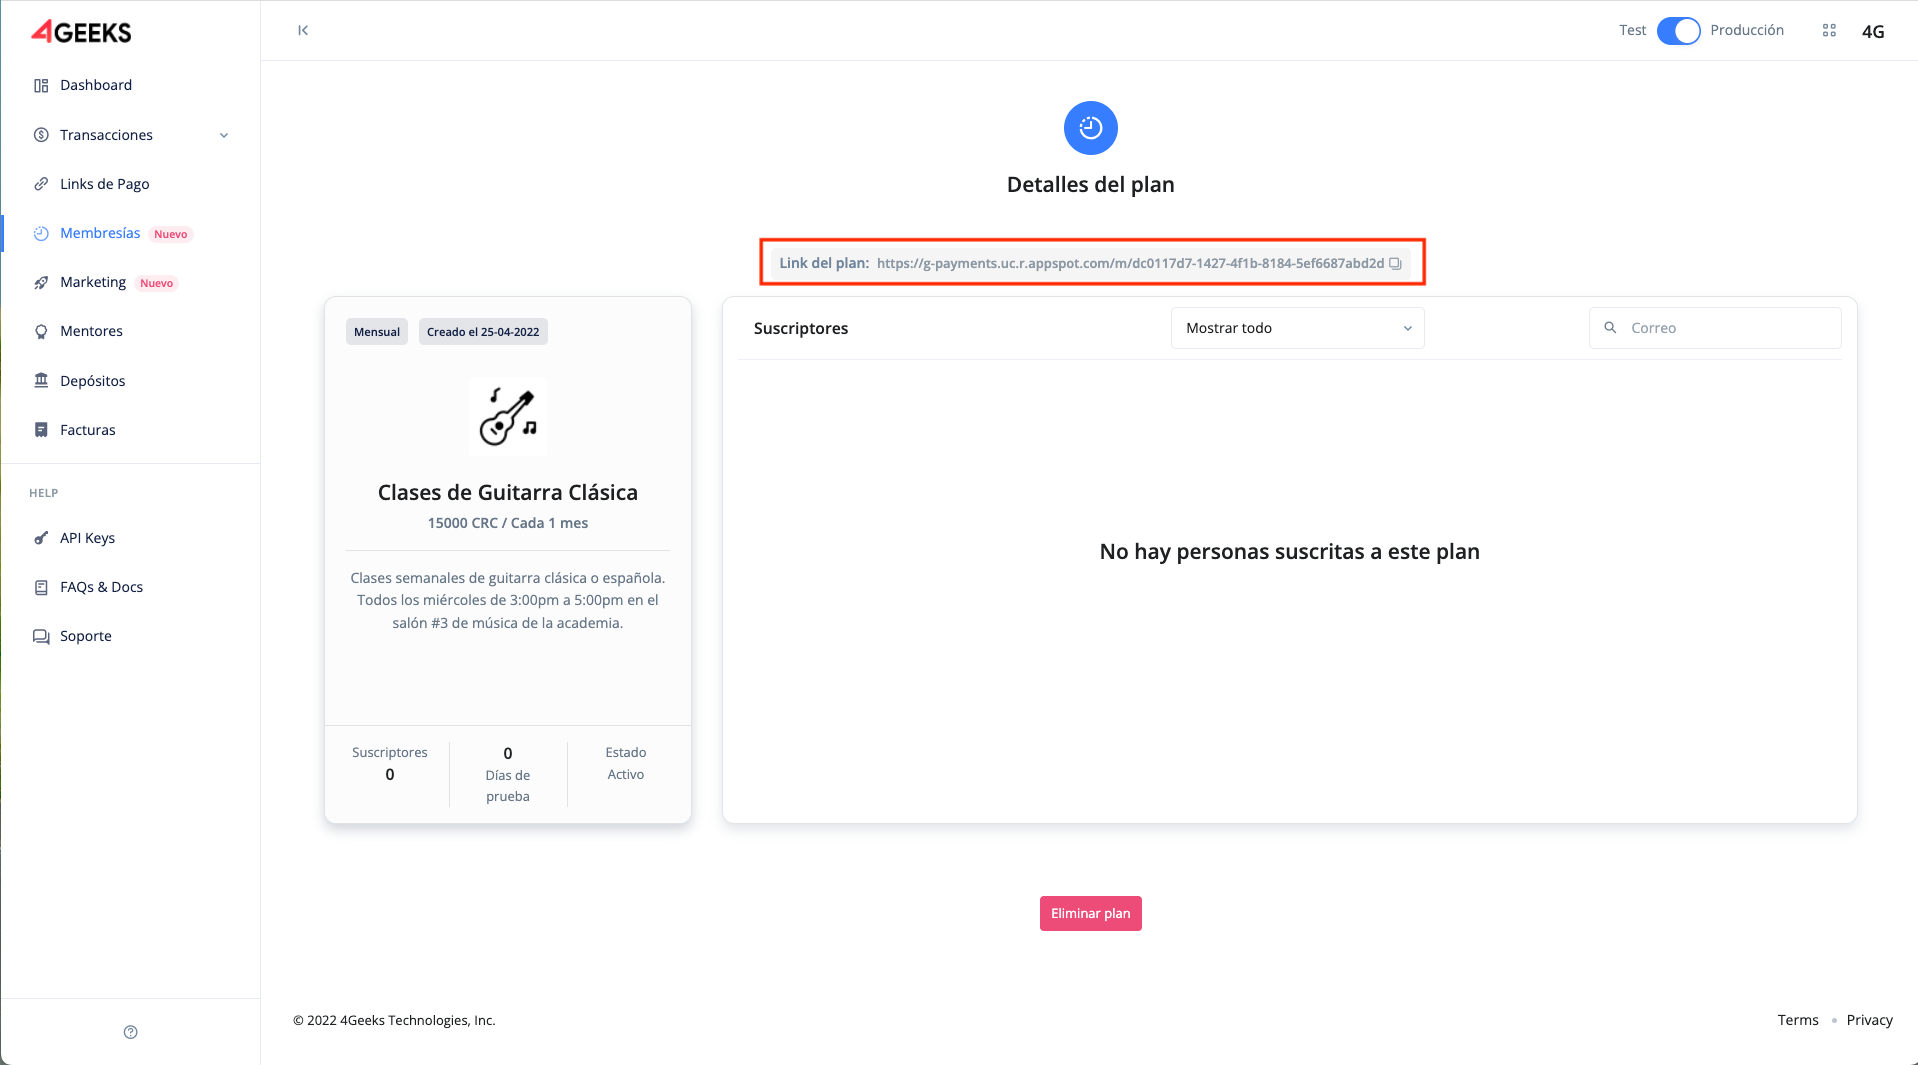
Afterwards, when closing the window, the user will be directed to the details of the same plan. On this page you can see the letter of the plan and a table with the information of the people who have subscribed to the plan and other details. In addition, in the upper central section there is a link to share the plan.
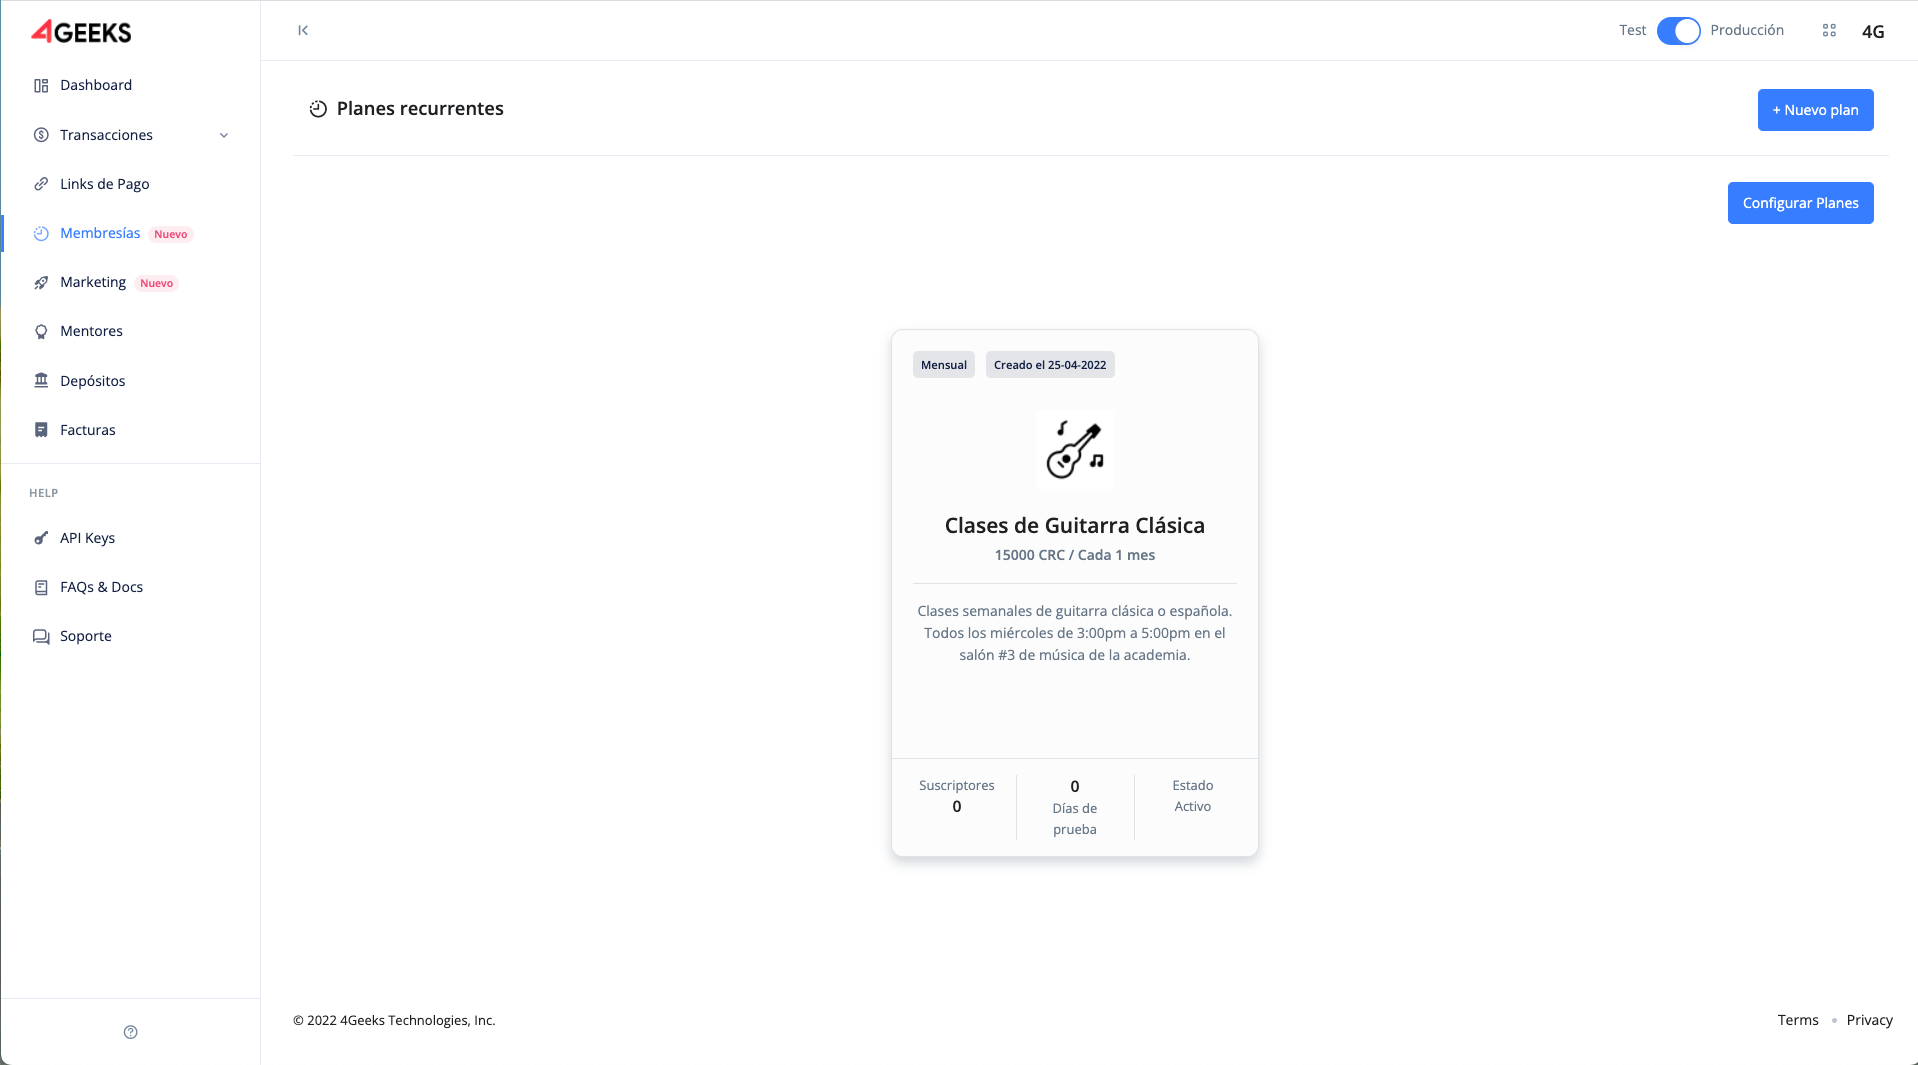
To see all the plans created to date, just click on the Memberships navigation option. When the plan settings are already configured and at least one plan exists, the plan charts are displayed. The plans are displayed by date of creation. That is, the most recent plan will be shown first in the list, from left to right until the file of available spaces is full.
Subscribe to a plan
Through the link shown in the detail page of each plan, this can be pasted and copied in any section or element of your website. However, in order for the subscriber user of the plan to obtain the membership it is necessary for the user who owns the plan to send some data of the subscriber user.
The data to be sent is as follows:
This data must be sent in post method to the same address of the plan link in a POST method, in the body of the request.
:::important Without this data it is impossible to subscribe a customer. It is important that the data sent is correct and valid, since it is based on this data that subscriptions are generated. :::
:::note Do not use invalid data or impersonation. :::
Below is a small and simple implementation of how it could be implemented. Using a small HTML form based on the following code:
{
  <html>
    <form
      method="POST"
      action="https://api.payments.4geeks.io/m/dc0117d7-1427-4f1b-8184-5ef6687abd2d/"
    >
      <label>Name: <input name="name" /></label>
      <label>Email: <input name="email" /></label>
      <input type="submit" value="submit" />
    </form>
  </html>
}
/ at the end. ::: Visually, the form would have the following view.

:::note This implementation is only an illustrative example of how the process works. This implementation may vary from case to case. :::
Once a subscriber user has accessed the link, he/she will be redirected to a page with a subscription (payment) form. Where the data for the execution of the recurring payment is requested. Below the name and email data were submitted during the form upload and are displayed on the form as non-editable fields.
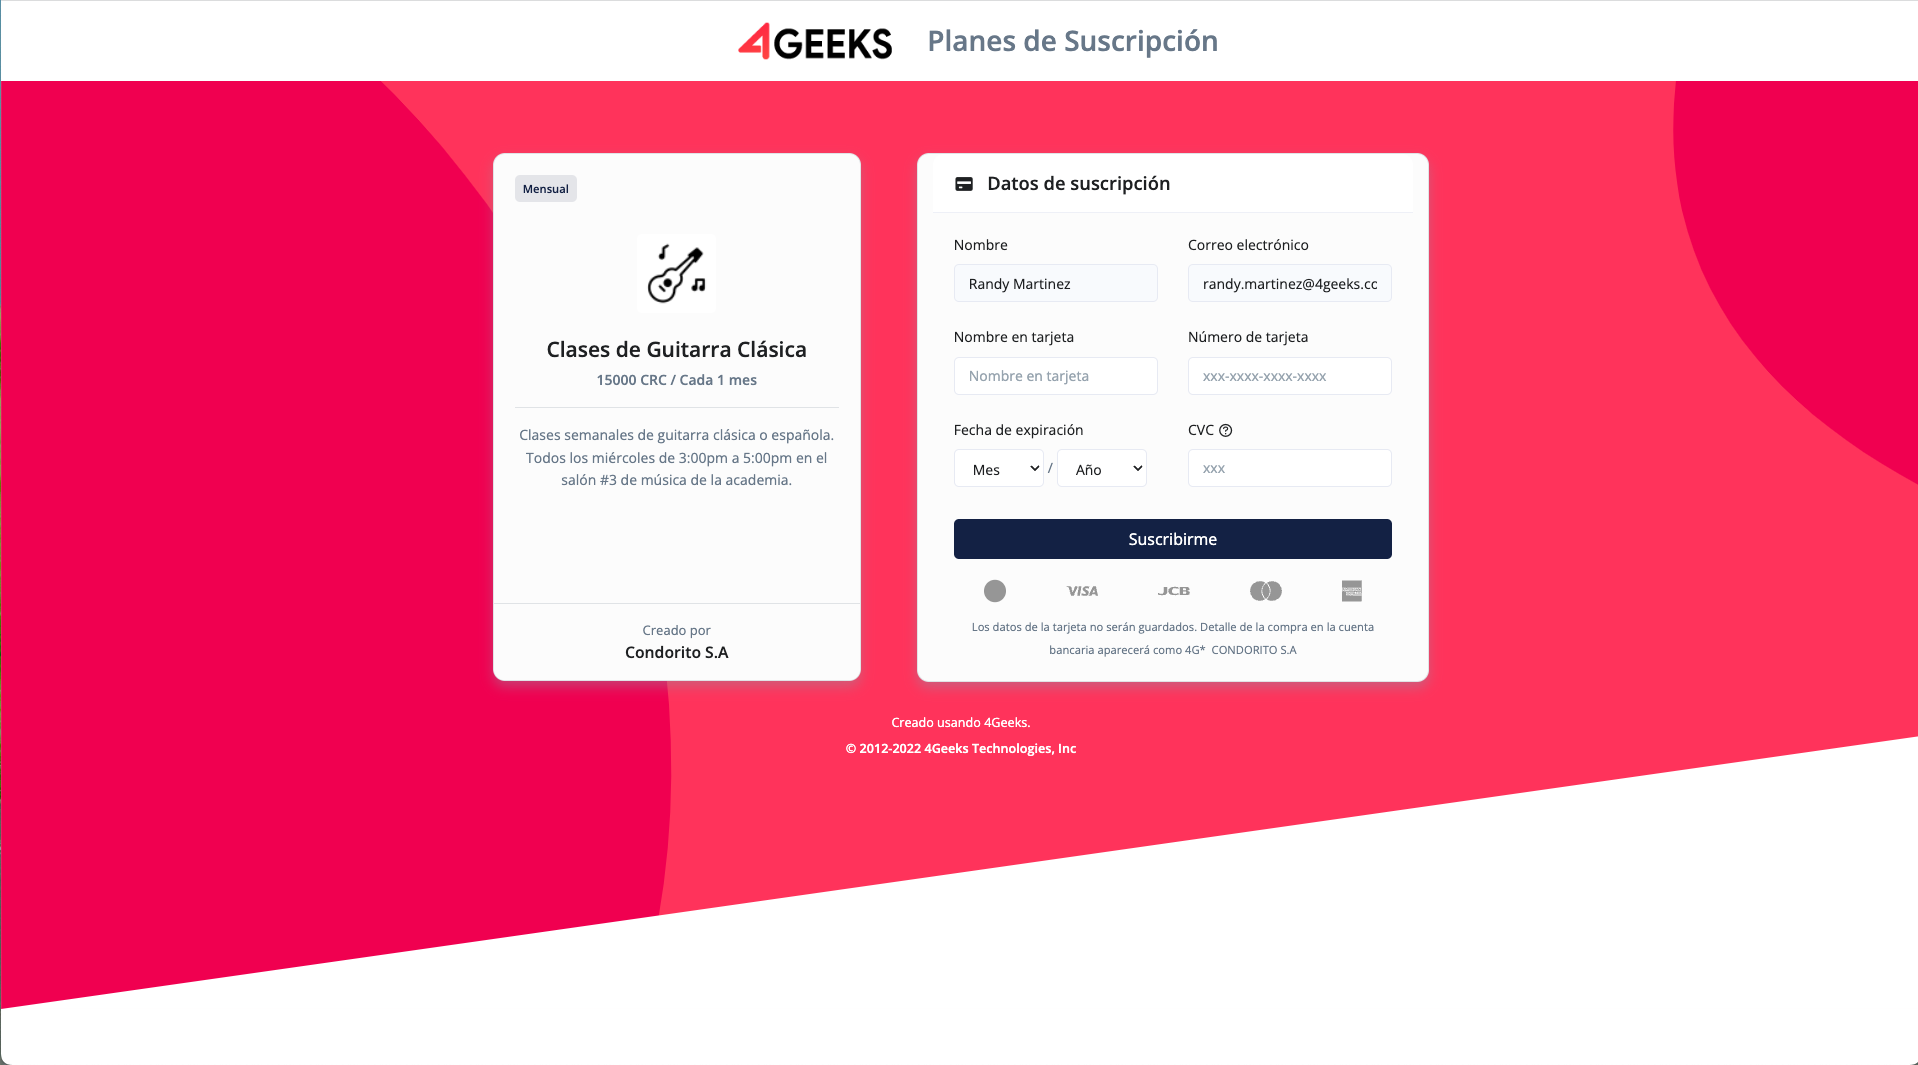
:::note In case of incomplete or erroneous name and email data, an error message will be displayed on the subscription page for subscribing customers. It is the responsibility of both of you to correct these details and try again. :::
:::note You cannot repeat the same email to generate multiple subscriptions to the same plan. However, you can use the same email in different plans. :::
When the requested data is filled in and processed correctly, a pop-up window with a success message is displayed. In case of failure due to wrong data or card error, a corresponding message will be displayed.
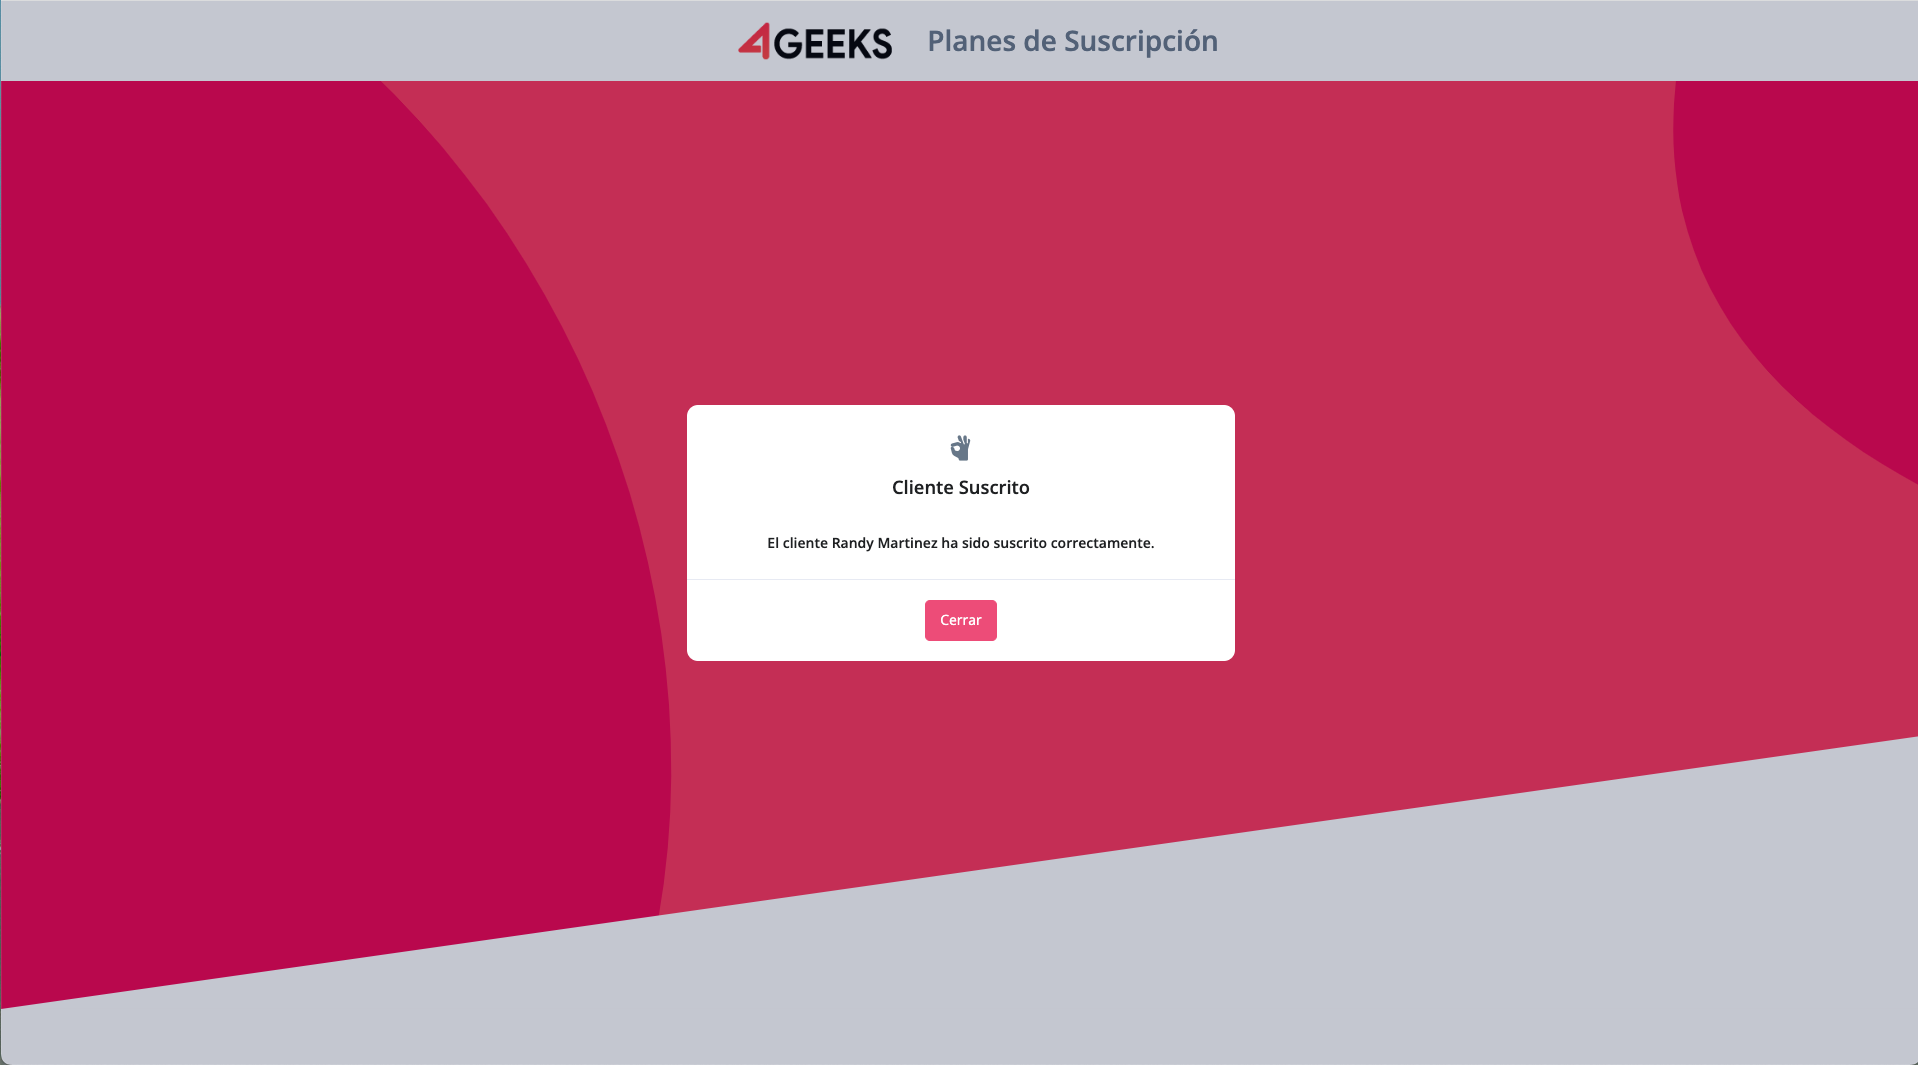
By clicking accept the subscribed user is redirected to the website of the user who owns the plan. If I don’t have that information set, the subscribed user will be redirected to the 4Geeks homepage.
Email notifications
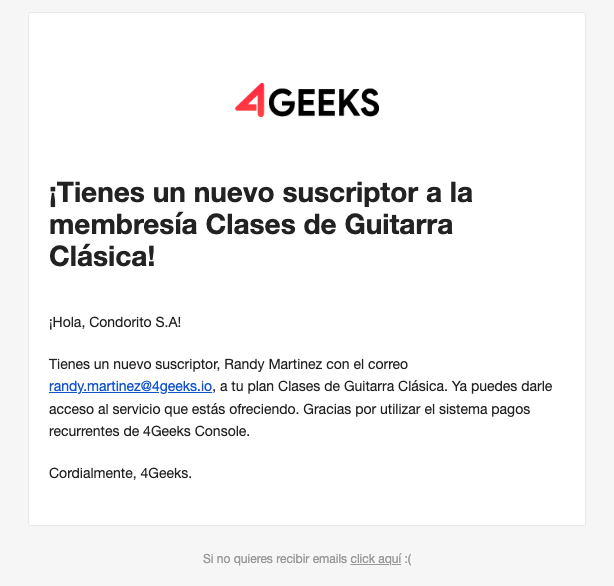
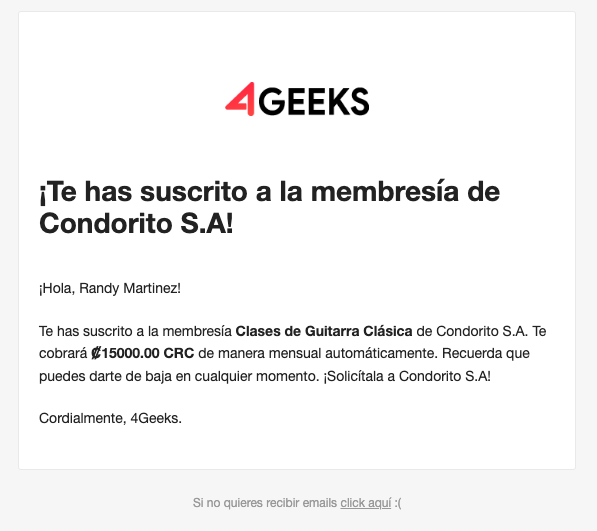
When a successful subscription or membership is generated, both the plan owner and the subscribed user will receive emails indicating the result of the subscription.
Email of the user who owns the plan:
Subscriber’s email address:
Webhook notifications
In addition to email notification, you have a response from a webhook.. As mentioned earlier (see Setting up your perfil section) the webhook needs a destination to send the response to when a subscriber user obtains a membership.
The KEY API, which is also mentioned is for decrypting the sent message. The webhook sends an encrypted message for data security. The encryption uses the RSA system, which works as follows: there are two keys, one public and one private.
The public key belongs to 4Geeks and is used to generate the encryption, there is a unique one for each plan owner. And there is a private key, which belongs to the user who owns the plan to decrypt.
:::note Once the message has been encrypted it is converted to Base64, however, the private key is sufficient to decrypt. :::
:::note the keys use the PEM format, so you must copy the API KEY as it is in order to use it. :::
The message sent contains the following information:
{
  'name': 'First name + last name'
  'email': 'names@email.com'
  'planId:' 'id',
  'planName': 'plan.name'
  'datetime:' 'plan.datetime'
  'subscribe': 'true'
}
Following the previous example, when the user who owns the plan subscribes to the plan receives a message with the following format:
FuaDlMF/TaNJnlmKPt/sPMxGyIQs8gPacGd3ScdbtzyEWXcky5/EoFgZWdt4p0wwfocr7s6oAIF
WosB1QWHL55pC4BHPFAxxvJx81A3L00DufBXEU8BNvywCEI7QMNR7qvhc6601VdRQG96E0oLClp
k8HF1/EwAvvcSPTB+qcSnVr7FoqrGGAOntvcAUYa0VwgfwdqMZYgBKE0XOMV7X7cqHsI5vqtuIB
G1oNAxLoOxHmjaYa+Q7KEYVRqA50RDRzg6IJvGpQCDEvlJQvmLnYRaESJDUq3YVos2H2x3Z+nUV
zuRIafcZFi7qtSqE6URFygrD4oMrbNN3TesRYATKIA==
However, it is encrypted. Therefore, you must use the KEY API to decrypt it. When you read the information you get the following data.
{
  "name": "Randy Martinez",
  "email": "randy.martinez@4geeks.io",
  "planid": "dc0117d7-1427-4f1b-8184-5ef6687abd2d",
  "planName": "Classical Guitar Lessons",
  "datetime": "2022-04-25 12:41:06 ",
  "subscribe": true
}
This data is merely representative, the reading and consequent actions depend on the needs of the plan owner based on this information.
:::note Setting the URL is mandatory, however, it is not validated. Therefore, saving an incorrect one would cause the data to go to the wrong URL. In such a case, the data is not readable due to the lack of the decryption key. This maintains the integrity of the information. :::
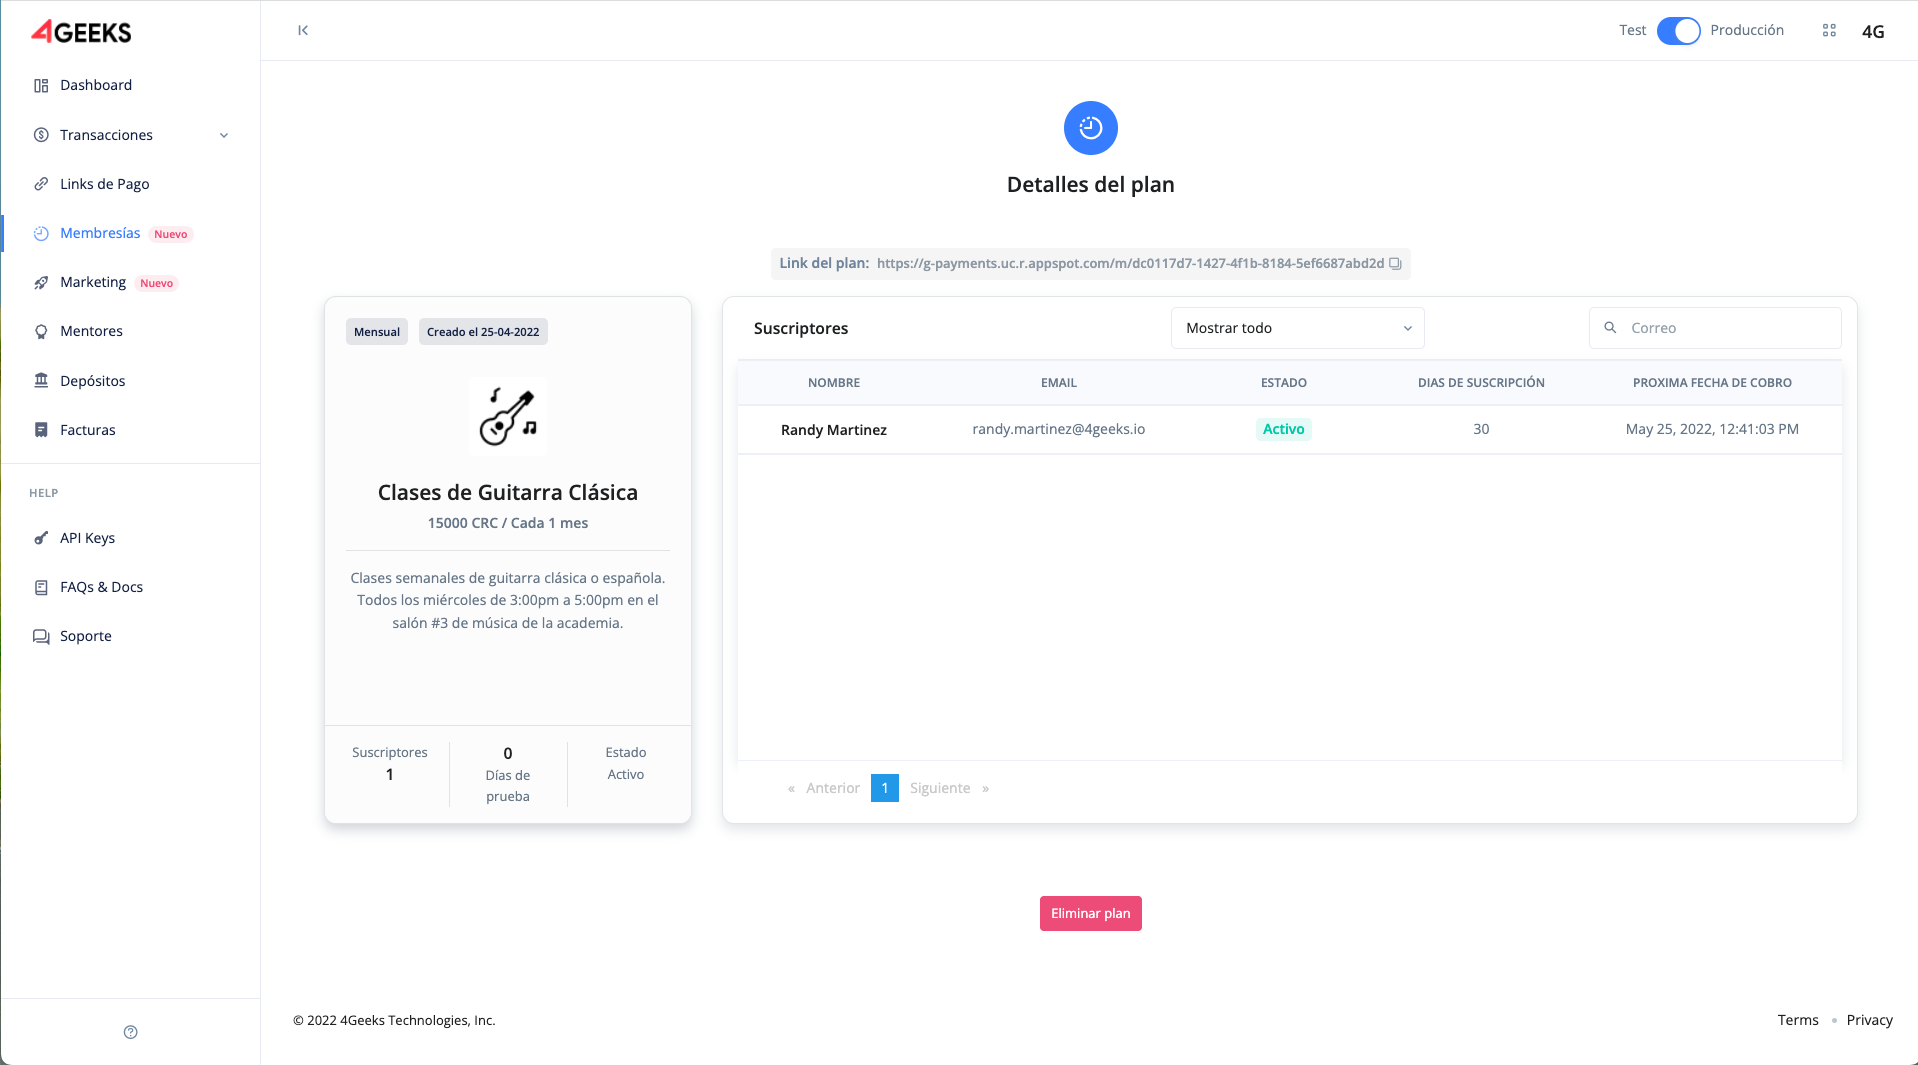
Once a subscriber user has completed the subscription to a plan, the plan owner can check it on the plan detail page.

In this case, you can notice that the basic information for subscriber control is displayed.
Unsubscribing from a plan
A subscribing user can voluntarily unsubscribe from a plan. This is accomplished in a similar way when generating the subscription. The plan owner must provide the unsubscribe link which is the same as the subscription link except that it contains the word unsubscribe.
https://api.payments.4geeks.io/m/0756e596-892e-4ee8-9a3b-3b21488ea25de/unsubscribe
Using the subscription example, you can repeat the code by adding the respective difference. It is reminded that the implementation is free in each case.
<html>
  <form
    method="POST"
    action="https://api.payments.4geeks.io/m/dc0117d7-1427-4f1b-8184-5ef6687abd2d/unsubscribe"
  >
    <label>Name: <input name="name" /></label>
    <label>Email: <input name="email" /></label>
    <input type="submit" value="submit" />
  </form>
</html>
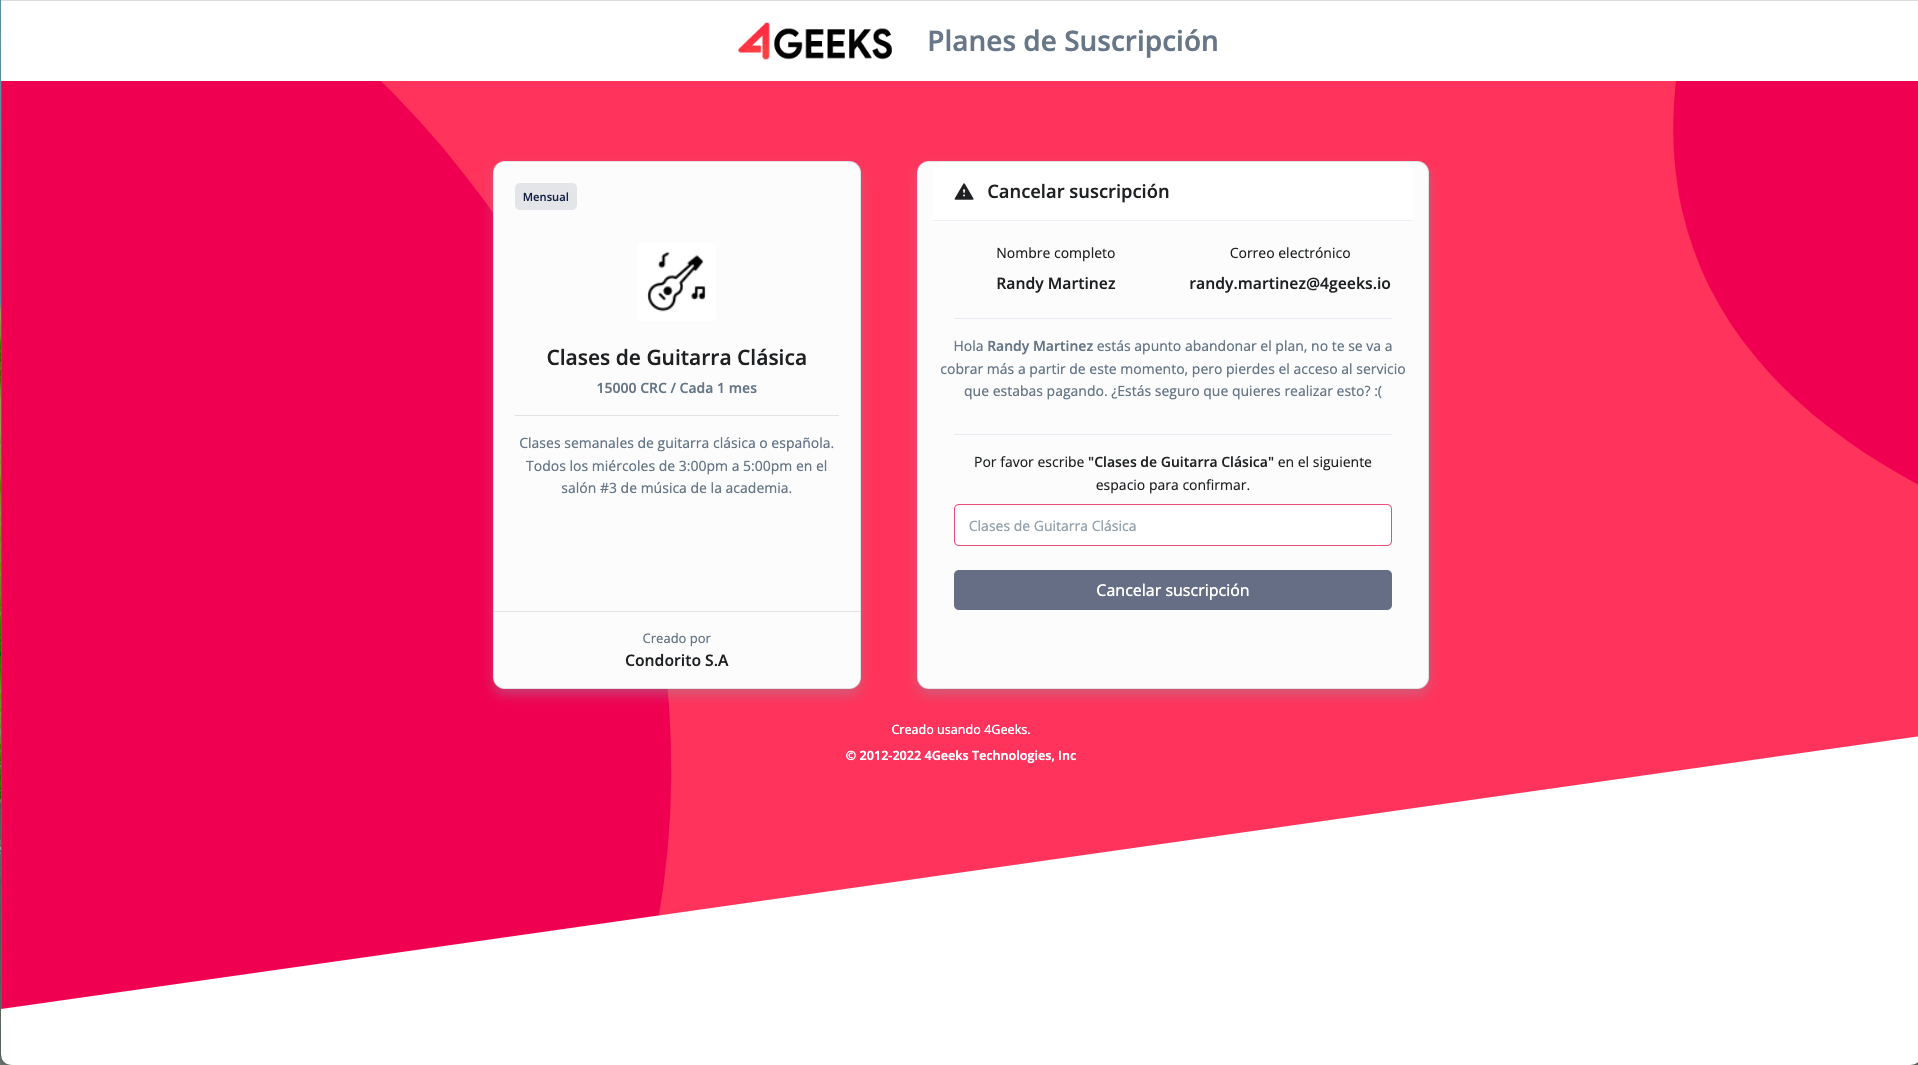
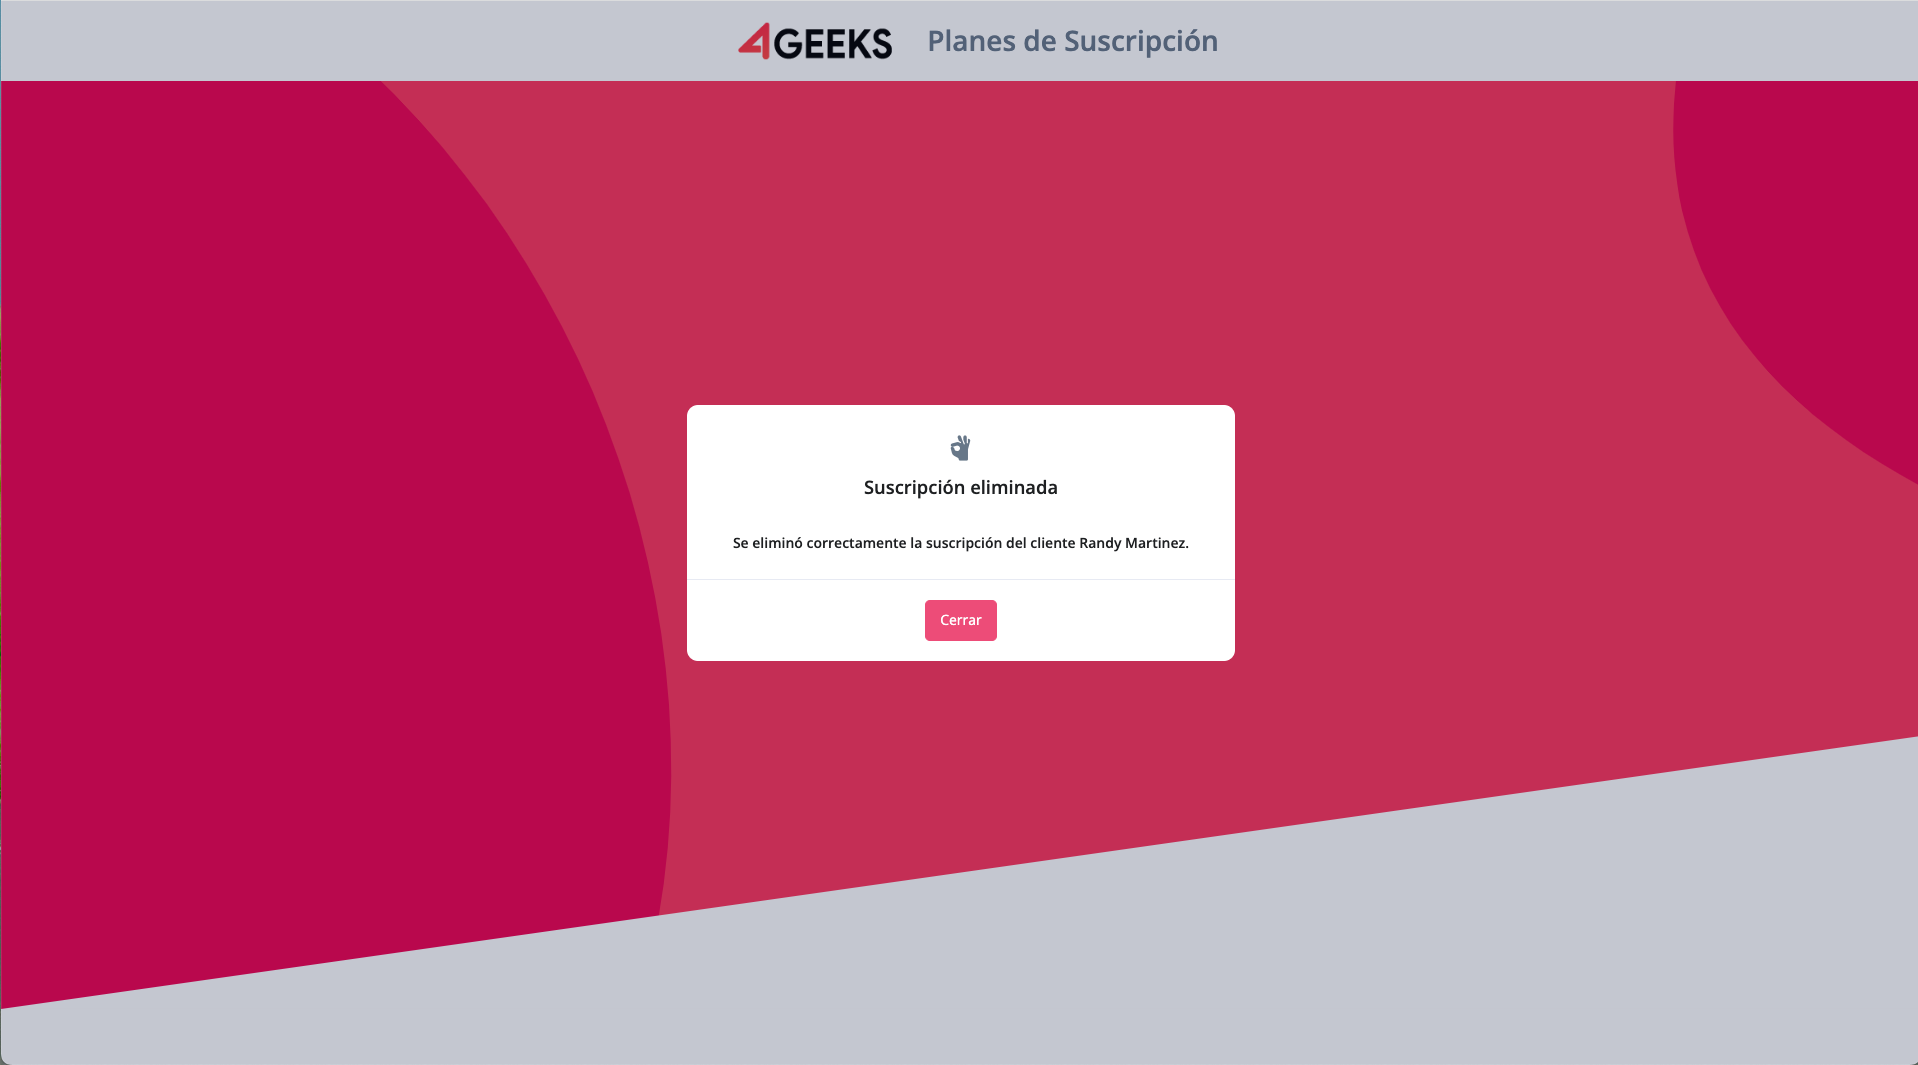
Replicating the subscription process, the user is redirected to a page with a form explaining the process to be performed. The user must confirm the membership cancellation process with the name of the plan.
:::note The name of the plan must be written manually, it cannot be copied or pasted. This is to ensure that the action to be taken is not done by accident. :::
Likewise, the owner of the plan must send the same data of the name and email to identify which user is requesting to remove the subscription. This data is sent by a POST method.
:::note No plan owner can remove the membership of a specific subscriber user. :::
Email notifications
Just like a subscription, two emails are sent, one to the owner and one to the subscribing user, when a membership cancellation is generated.
Mail from the plan owner:

Subscriber’s email address:
Webhook notifications
When generating an unsubscription, an automatic reply is also sent via a webhook. Following the same application as explained for the generation of a subscription, the body of the message contains the following information:
Bz1qJ0PAZf6jrPpMC5sh2W0nGchUsgMqwblQHyZWgJ30X9cFPWO1v3vAa11JaC1IP7OULhTIWxL
vDk0XJSAhoG3VPdC0CLRAOBrjRCJsAZEwQtU31EHxWw3m5gR+HgIVqk6K9Wdi2oBZXWH1YmG0r/
xYxTaZM3JwOoQvAmMBxhb7aVHyLqm9azrpGcoCMlNw2bPZxCmdw4P7HWEhbpV/iWjSVx2VPGIJ/
ErNHYGNU0yclS6WIGEJ8F5b5ONMQYu6XBuSMURPgEGZXhfpdA6kprc+v9K3nijy2Xq0+yb2iHCO
hlI1OQFvsFwk3uu1ef9tpqVBIzaOo0N3IlMg/4xc+Q==
However, it is encrypted. Therefore, you must use the KEY API to decrypt it. When you read the information you get the following data.
{
  "name": "Randy Martinez",
  "email": "randy.martinez@4geeks.io",
  "planid": "dc0117d7-1427-4f1b-8184-5ef6687abd2d",
  "planName": "Classical Guitar Lessons",
  "datetime": "2022-04-25 13:26:04 ",
  "subscribe": false
}
Again, it is up to the plan owner to decide how to process this information to control their services.
Once a subscriber user has cancelled their membership to a plan. The plan owner can check it on the plan detail page.
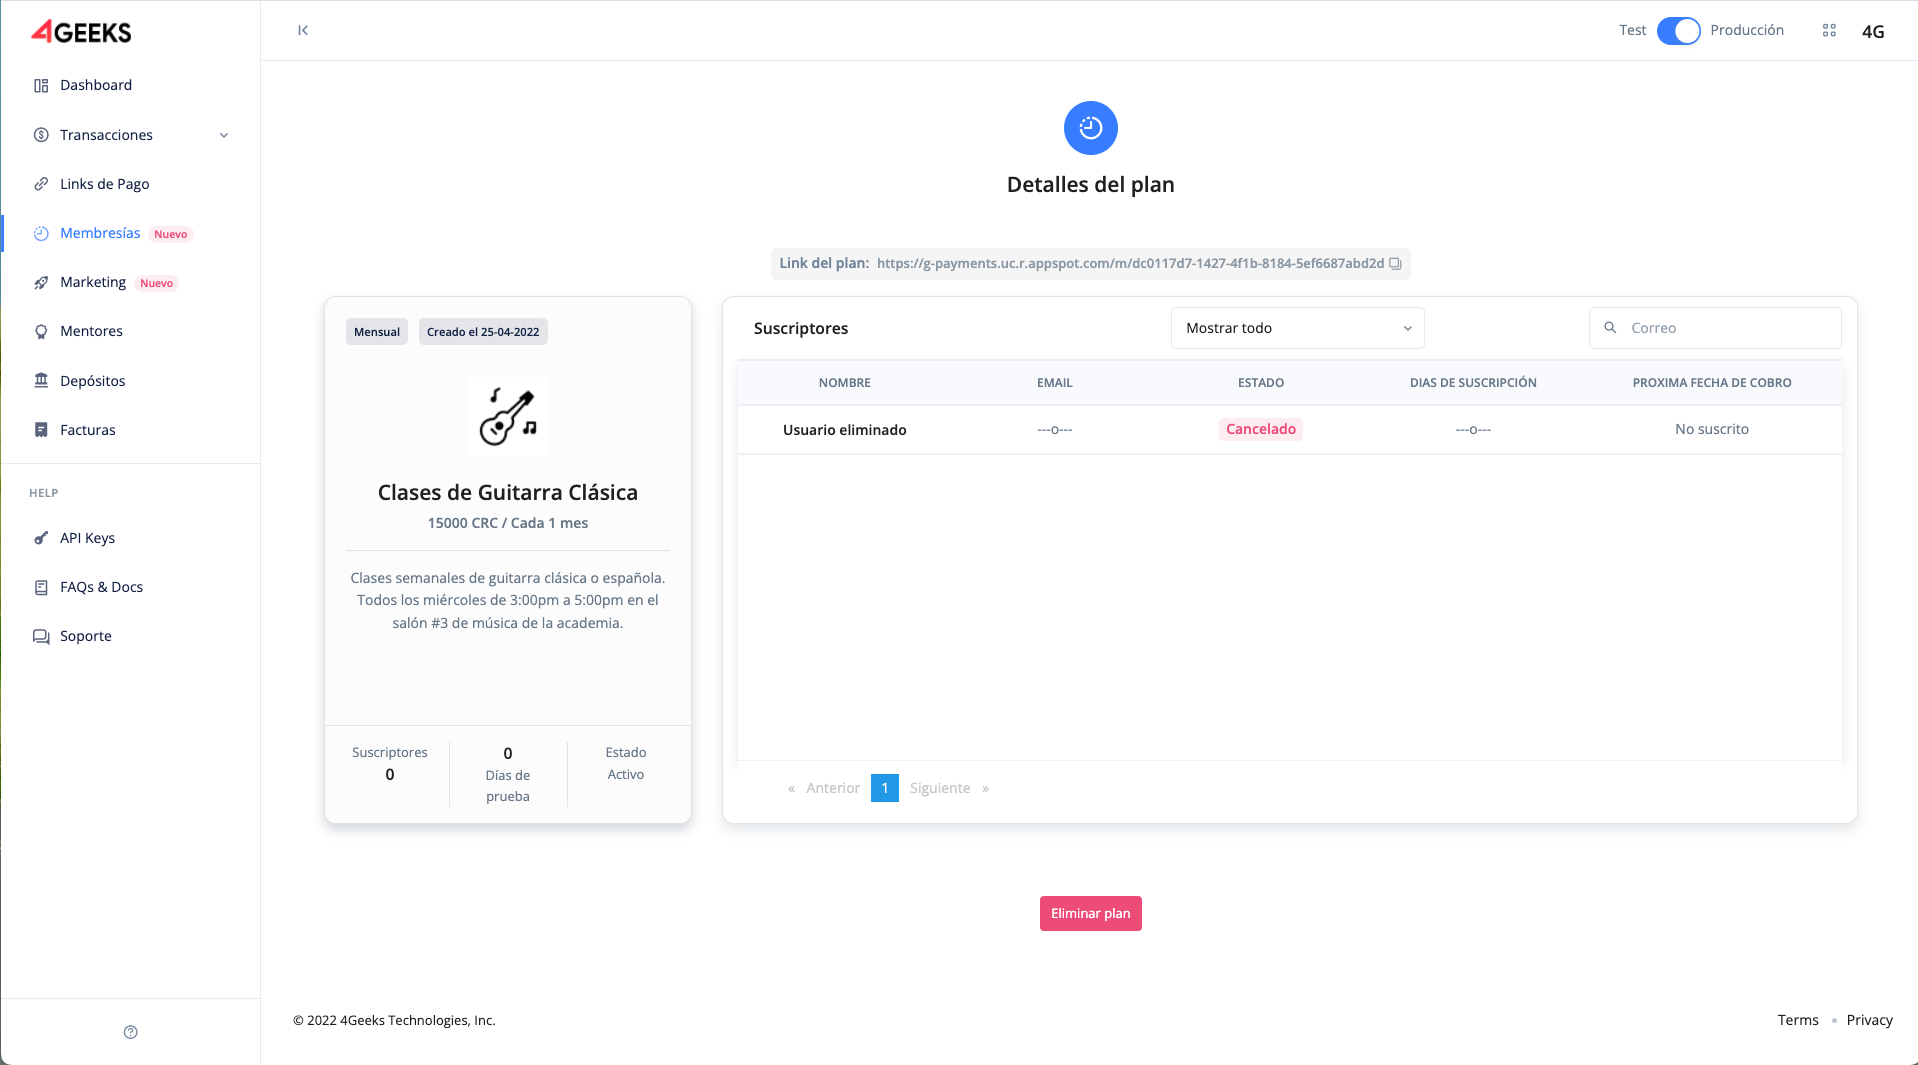
In this case, you can notice that a fila is displayed with the deleted user detail. This is for the care of the information of users who once had membership but decided to delete it.
Delete a plan
Every plan owner has the option to delete a plan they have created. However, this involves several conditions:
- All subscribers will have their memberships cancelled.
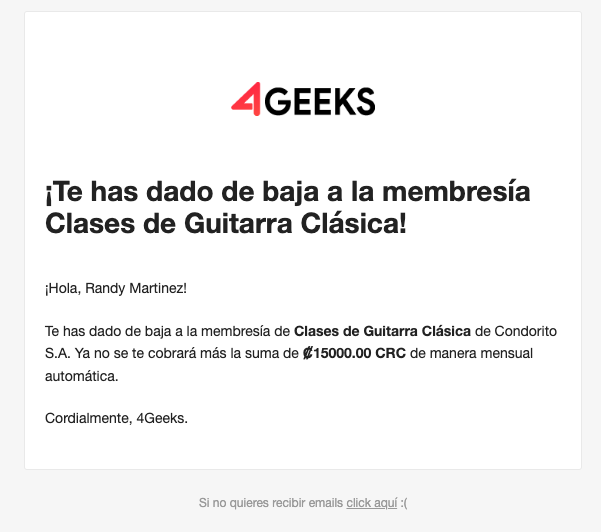
- All subscribers will receive an email notification with this action.
It is important that every user who owns the plan notifies personally and in advance to his subscribers that the plan is going to be deleted. In this case, it is up to the user owner to have the permission of his subscribers.
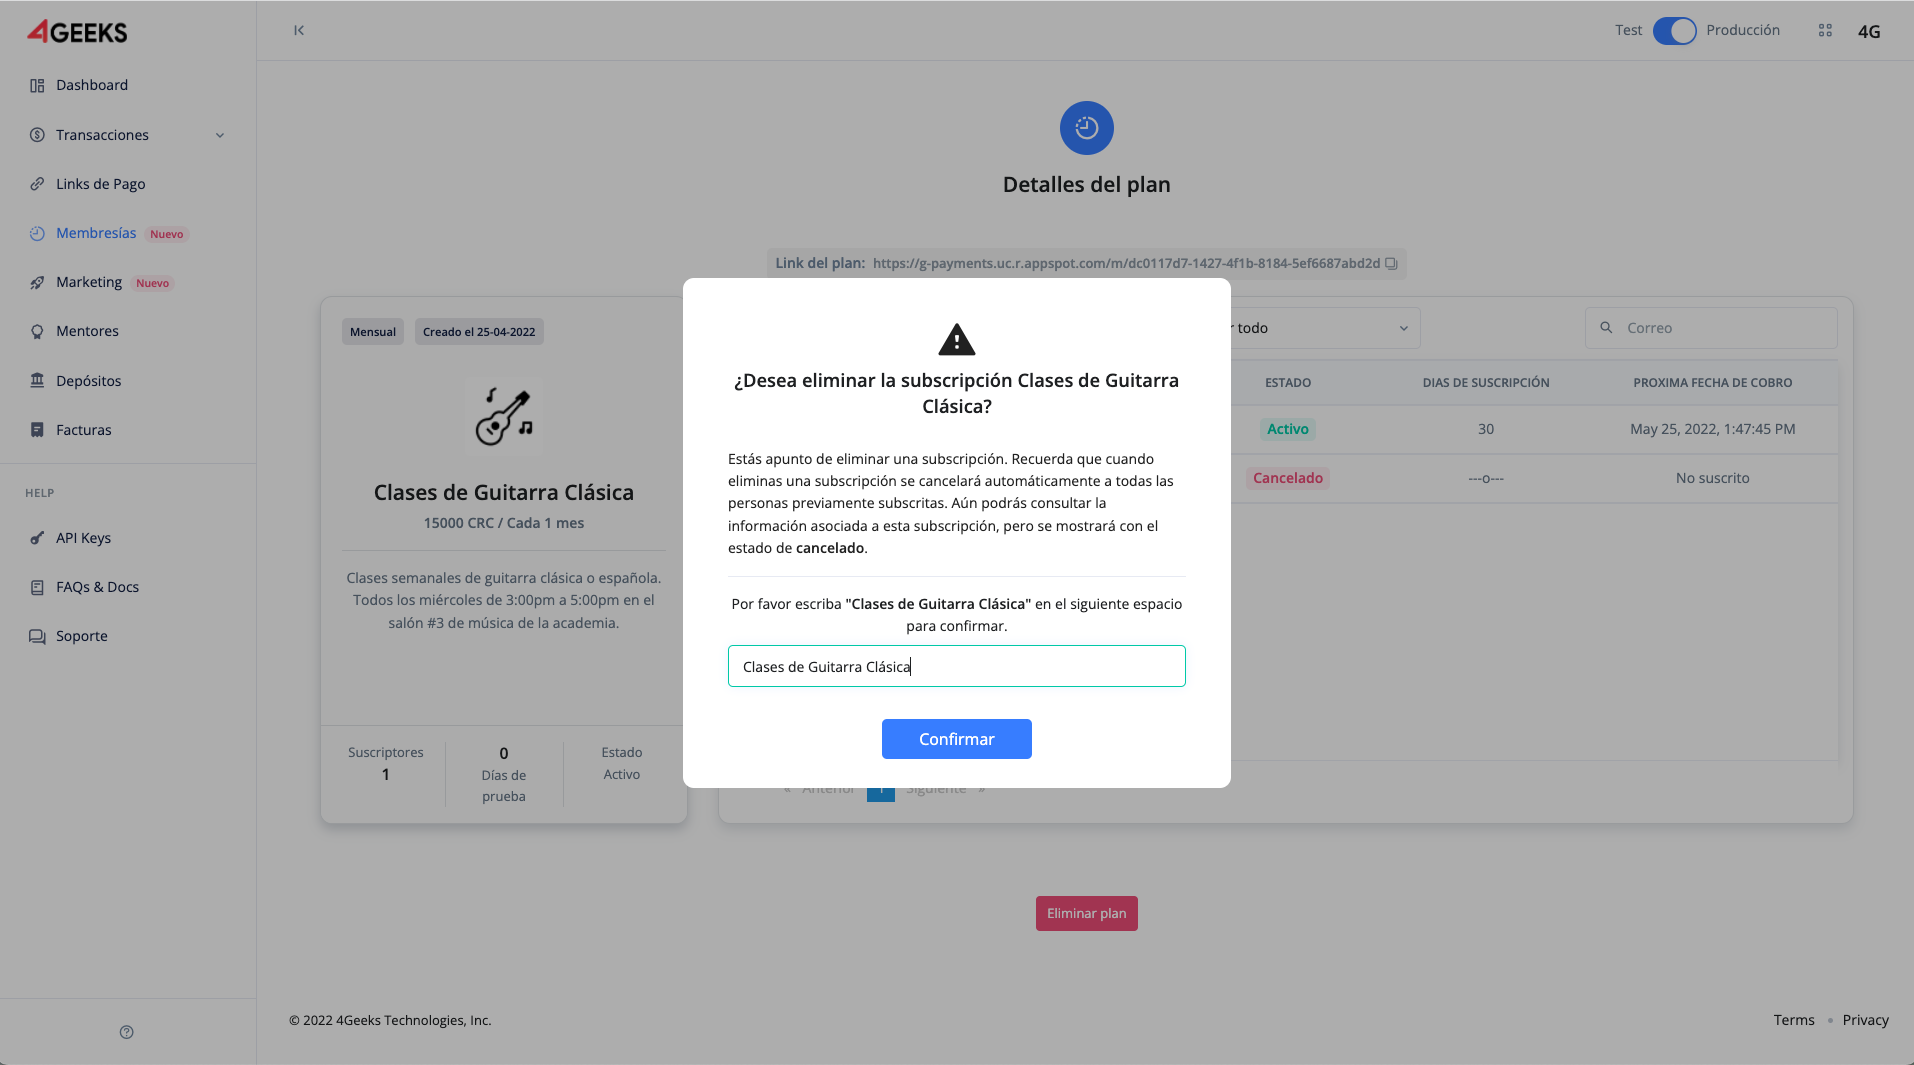
To delete a plan, go to the detail page of a specific plan. In the bottom section you will find a Delete plan button. When you click it, a pop-up window appears with a message explaining the action to be performed. Similarly, the client user must type the plan name manually to confirm the deletion of the plan.
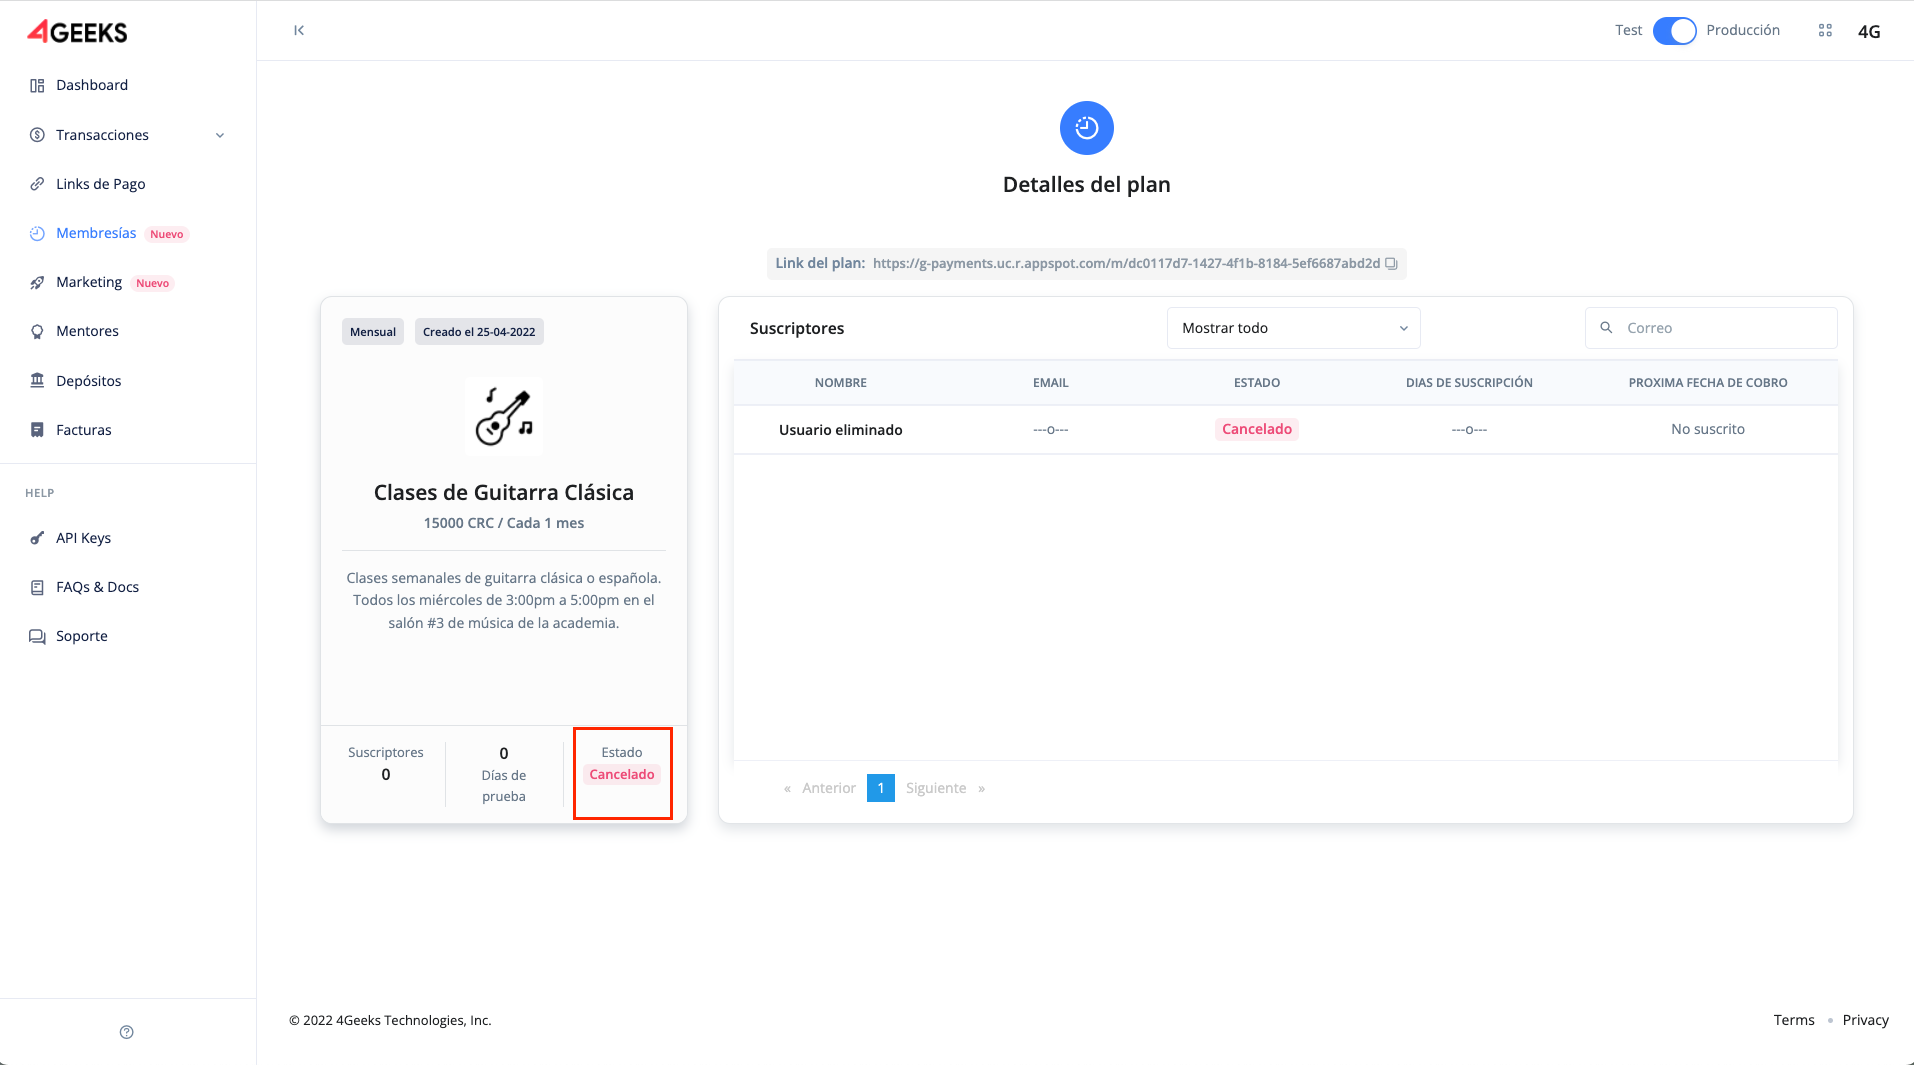
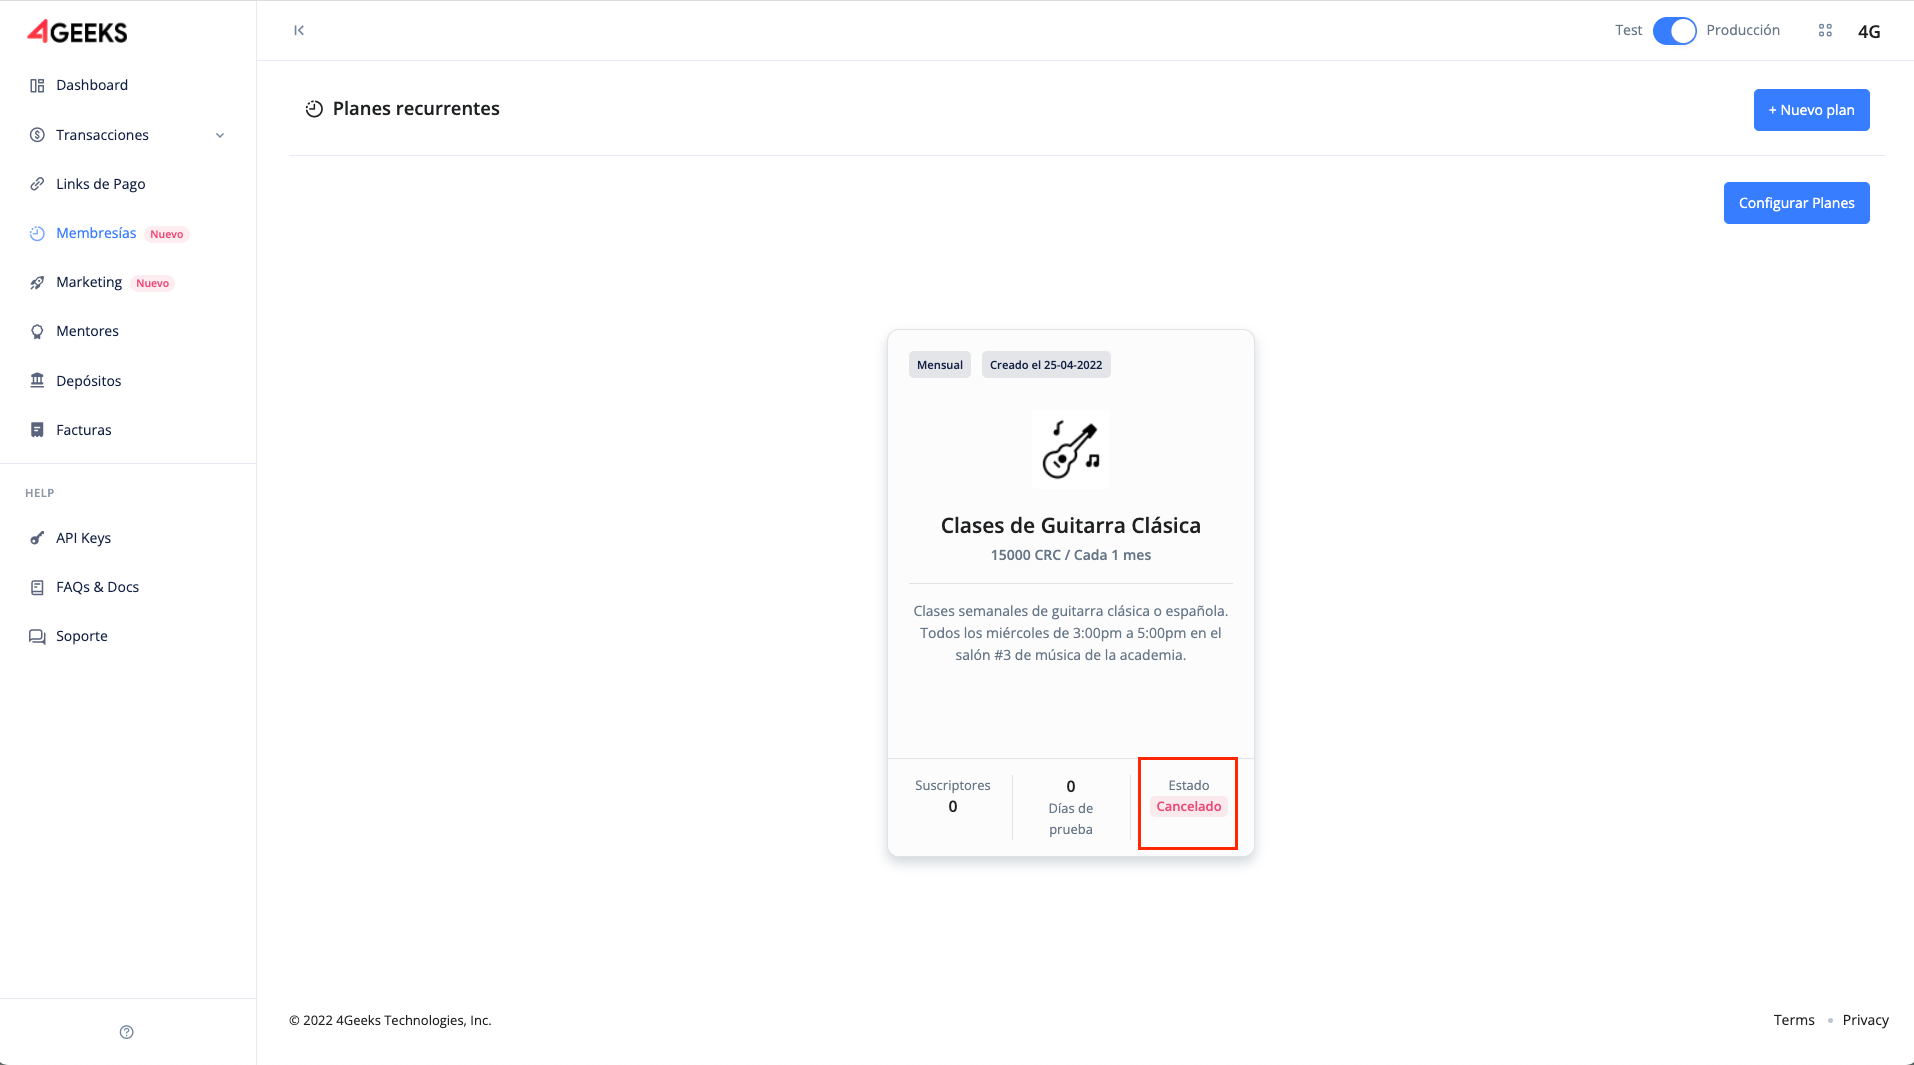
When you confirm the action, the plan status will change to a red highlight with the word Canceled. In addition, in the table all the files are deleted and only a single file is shown with the same detail as when a subscriber user cancels their membership. This same visual property is reflected in the list of all plans.
All subscribers will receive an email with the following message:

Additional conditions
- Plans cannot be edited once created.
- There cannot be two plans with the same name.
- A user can only subscribe to a plan with a single email, that is, you can not repeat emails subscribed to the same plan.
- The plans do not have an expiration date, that is, once they are created they are permanent and the payment is made according to the periodicity established in their creation.
- When you delete a plan, that name cannot be reused because the plan still exists in the user’s records.
- Users must always subscribe on their own, there is no method that the plan owner.
- All data sent by the webhook is encrypted, it is the responsibility of the user owner to be able to receive and manipulate this information.